One Community
Soil Amendment and Initial Off-grid Site Preparation
This page shares a large-scale soil amendment and initial off-grid site preparation strategy. It covers surveying, site selection, soil preparation, swale creation, initial planting and more for improving 3 acres of low-quality soil, enough space to grow sufficient food to feed 100 people within 1 year. We are open source sharing this comprehensive soil amendment and land preparation strategy because we know that doing so will significantly increase the land options for people seeking to grow their own food. As we arrive on the property and start preparing it, this page will evolve with open source videos, updated labor investment details, cost analysis details, and all other specifics needed to duplicate our efforts. It contains the following sections:
- What is a Soil Amendment Strategy
- Why Open Source a Soil Amendment Strategy
- Ways to Contribute
- Consultants
- Surveying the Land
- Garden Plan
- Site Selection and Soil Assessment
- Site Preparation
- Irrigation
- Soil Preparation and Amendment
- Worms and Vermiculture Composting
- Regular Aerobic “Hot” Composting
- Planting
- Labor Projections, Tracking, and Updating
- Additional Considerations
- Resources
- Summary
- FAQ
RELATED PAGES (Click icons for complete pages)


")


")
")
")
CLICK THESE ICONS TO JOIN US THROUGH SOCIAL MEDIA
![]()
![]()
![]()
![]()
![]()
![]()
![]()
![]()
![]()
![]()
WHAT IS A SOIL AMENDMENT STRATEGY
The One Community soil amendment strategy from our horticulturalist and botanist prepares a property of below-average soil to become a successful growing environment. It covers all aspects of the preparation process from surveying the land and site selection to fencing, grading, cover crop planting, composting and more. This is being done for the following three key areas of our food infrastructure:
Ideally, the initial soil amendment and property preparation team will begin with 15-18 people including 2 permaculturalists, a general contractor, an architect, a civil engineer, a survey team, a soil scientist, a hydrologist, a botanist, and a horticulturalist. For our open source goals, we will also include a videographer and one web designer/open source tech on the initial team; coordinating the bulk of the open source design and sharing through the rest of our team off-site. The second arrival of participants (4 weeks later) will consist of the remainder of the Pioneers and, due to the comprehensive nature of our open source goals, include the additional essential skill sets of 1-2 heavy equipment operators for the backhoe and excavator, 4 well versed in carpentry, 2 with electrical, plumbing and mechanical backgrounds (with knowledge of pumps and pump capabilities), and an experienced mechanic to keep all our equipment running (heavy equipment, vehicles, and small engine service & repair). Everything this team does will be open source shared by as as a strategy and blueprint for others to use too.
WHY OPEN SOURCE A SOIL AMENDMENT STRATEGY
 Open source sharing a comprehensive soil amendment strategy is essential to helping people create food self-sufficiency. We feel our strategy for doing this on enough land to feed 100 people within 1 year is essential to our global-change methodology and self-replicating teacher/demonstration community, village, and city approach because it significantly increases the options for people seeking to grow their own food. In developing this approach we are bringing together the best of the best with the intent to evolve it indefinitely through global collaboration and input.
WAYS TO CONTRIBUTE TO EVOLVING THIS SUSTAINABILITY COMPONENT WITH US
SUGGESTIONS | CONSULTING | MEMBERSHIP | OTHER OPTIONS
CONSULTANTS ON THIS COMPONENT OF ONE COMMUNITY
Mary Nelson: Landscape Planner
SURVEYING THE LAND
Surveying the land is the first step of the soil amendment process and it will commence during the 1st week of us owning the property and continue intermittently throughout the project even after the initial survey. We will do this for contours and possible increased resolution of the contour map for swale planning and other earthwork, identification of building sites for POD 1 and The Duplicable City Center, and locating water holding tanks and planning other water infrastructure.
When surveying the land for soil amendment important things to note are:
- Slopes/low areas: these can impact water drainage and influence garden layout. Often the terrain of the land can be used to your advantage.
- Sunlight: the amount of sunlight available is crucial to the success of any garden. Understand the difference between morning sun and afternoon sun. Afternoon is much stronger.
- Compaction: understanding how the land was used prior to planting will give you a good idea of how viable the soil is. For example, knowing if there was heavy machinery driven over it frequently would imply that your soil is severely compacted. If prior use is unknown, there are simple tests you can perform. These are described below.
GARDEN PLAN
Once you have surveyed the land it is important to develop a garden plan. This will serve as the foundation for your entire gardening process, helping you stay organized and ensure that every step is well thought out. A garden plan consists of:
PLANT SELECTION
Choosing the right plants for your garden is the foundation of a successful growing season. Each plant has specific needs such as sunlight, soil type, and watering schedule that must be considered during planning. Selecting the appropriate species and understanding their characteristics will help you create a thriving and low maintenance garden tailored to your local environment.
- Knowing what you are planting allows you to understand the plant’s specific requirements (light, water, soil). This allows you to pick an adequate site and amend the soil accordingly.
- Familiarize yourself with the native plants. Installing native fruits and vegetables will drastically cut the amount of soil amendment, pests, maintenance, and overall care for your garden.
THE PLANTS WE CHOSE AND WHY
Detailed section coming soon about how and why we selected our plants.


VIDEO COMING: WHAT WE LEARNED BASED ON THE PLANTS WE CHOSE
SEE OUR HOW TO HELP AND/OR CROWDFUNDING CAMPAIGN PAGE TO HELP CREATE ALL THE TUTORIAL VIDEOS FASTER
YIELD EXPECTATION
Estimating the yield from your garden allows you to plan efficiently and minimize waste. Whether you are growing for personal consumption or community sharing, understanding your space, growing season, and how much food you realistically need will help guide your planting decisions and optimize your harvest.
- Understanding how much produce you can use or process will prevent any food waste, extra work, or potentially not producing enough.
- Factors to take into consideration are your growing season and how many people you are trying to sustain.
- A general estimate is 200 square feet of garden will feed one person for one season. You need food for outside the growing season though, and this number is different for different diets. 200-400 square feet is a common estimate for a primarily vegetable diet, with 4,000 square feet needed for a self-sufficient, year-round vegetarian diet including grains and root vegetables.
VIDEO COMING: HOW WE MAXIMIZED CROP YIELDS
SEE OUR HOW TO HELP AND/OR CROWDFUNDING CAMPAIGN PAGE TO HELP CREATE ALL THE TUTORIAL VIDEOS FASTER
THE AMOUNT OF FOOD YOU NEED AND WHY
As stated above, a general estimate is 200 square feet of garden will feed one person for one season. You need food for outside the growing season though, and this number is different for different diets. 200-400 square feet is a common estimate for a primarily vegetable diet, with 4,000 square feet needed for a self-sufficient, year-round vegetarian diet including grains and root vegetables.
To come up with One Community’s estimate of 3 acres to feed 100 people, we assumed the following:
- A combination of Vegans, Lacto Vegetarians, Ovo Vegetarians, Lacto-ovo Vegetarians, Pescatarians, Pollotarians, Flexitarians and Omnivores
- Population of more Vegetarian varieties than Omnivores
- Purchasing of grains because of the low cost and challenges and space required to grow them
- Additional protein ethically and sustainably supplied by rabbits, chickens, sheep, and goats NOT included in this space estimate.
- Time needed to fine tune the production process and maximize yields
One acre is 43,560 square feet. So 3 acres x 43,560 square feet = 130,680 square feet. Divide that by 100 equals about 1300 square feet per person. Much for than the 200-400 square feet estimated need for a primarily vegetable diet, but much less than the 4,000 square feet needed for a self-sufficient, year-round vegetarian diet that would normally include growing of heavy-space-needs grains.
VIDEO COMING: YIELD EXPECTATIONS VS REALITY: WHAT WE’D DO DIFFERENTLY NEXT TIME
SEE OUR HOW TO HELP AND/OR CROWDFUNDING CAMPAIGN PAGE TO HELP CREATE ALL THE TUTORIAL VIDEOS FASTER
SITE SELECTION & SOIL ASSESSMENT FOR PLANTING
We have calculated 3 acres will be necessary for food production capable of growing enough food to feed 100 people within 1 year. We will also begin with a small amount of rabbits, chickens, sheep, and goats. Site selection to accomplish both our short-term and long-term goals will be for large-scale gardens, hoop houses, and food forest creation. Here are the important criteria:
SITE SELECTION: LARGE SCALE GARDENS
Selecting the right site for large scale gardens is essential for long-term success and sustainability. The location must support healthy plant growth, efficient water management, and ease of access for maintenance. Careful consideration of sunlight, soil, slope, water availability, and airflow can significantly reduce future problems and enhance productivity.
Open area with good solar exposure
- “Good Solar Exposure” is relative. Shielding your garden from the direct afternoon sun could be ideal the closer you are to the equator, but detrimental the further away you are. It’s important to know your climate and plant’s needs.
Well draining soil
- Poorly drained soil perpetuates disease. Without water filtration your plant’s roots will rot.
Slight slope away from any structures
- Having a slight slope in a garden allows planting a variety of plants with different watering needs.
- The slope will also direct water away from structures and any water coming off structures to the garden.
Ensure a water source is available for supplemental watering
- Supplemental watering cannot be avoided. You must have a plan to provide water to your plants for establishment and during periods of drought.
- Planting native plants ensures they will thrive in your specific climate and will reduce watering needs
Ensure good airflow
- Airflow helps plants establish a sturdy form.
- Having little airflow will increase the presence of pests.
- Without airflow, cold and hot air can get trapped, long exposure to either may adversely affect crops.
Open area with good solar exposure
Deep well drained soil (or drainage improved through ripping)
Land that is more or less level (or gently sloping) so it can be contoured into growing beds
Water access; source location? Can it be gravity fed or is a pump necessary? What is the pH level? Is there a site for a holding tank?
Avoid low lying pockets where cool air may settle and have adverse effects on crops as this will decrease the growing season
SITE SELECTION: HOOP HOUSE
Hoop houses shield plants from harsh weather. Often hoop houses are thought of as enclosed structures to capture heat and extend the growing season, but in some parts of the world, where it stays warm, a hoop house can be made of shade cloth to help shield plants from intense heat during the hottest months.
- Open area with room to expand if needed
Choose an area that meets your current spatial growing needs and allows for expansion.
- Include storage for tools, containers, soil, and seed.
- Select a proper sun exposure site for your needs. In cold climates provide a full southern exposure while areas closer to equatorial zones should select a site with some tree shading.
Level ground
- Be sure that the site chosen is level, this allows for the most sustainable and economical build.
- Make sure the ground under the hoop house drains properly and does not hold water.
Ensure water is available
- Hoop houses are enclosed structures, so whether by hand or irrigation, all watering must be done mechanically.
SITE SELECTION: FOOD FOREST
Establishing a successful food forest begins with choosing the right location. A food forest includes fruit trees, shrubs, herbs, and groundcovers, all of which have specific environmental needs such as sun exposure, airflow, and soil structure. Selecting an open and well-drained site that supports this diversity will promote healthy plant growth, increase yield, and reduce long-term maintenance.
Open area
- Most fruit trees prefer a southern exposure for best pollination and fruit development.
- Avoid low lying areas where cooler temperatures are trapped.
- Avoid hilltops and ridges as they tend to have excessive winds.
Well-Draining Soil
- The preferred soil is well-drained and loamy.
- Conduct a compaction test prior, fruit trees require loose, deep soil for their roots.
Once the specific sites have been selected, the next steps are to:
- Conduct a perc test for drainage
VIDEO COMING: HOW WE CONDUCT A PERC TEST FOR DRAINAGE
SEE OUR HOW TO HELP AND/OR CROWDFUNDING CAMPAIGN PAGE TO HELP CREATE ALL THE TUTORIAL VIDEOS FASTER
- Extract soil samples for a complete soil analysis (chemistry, organic matter content, etc.)
VIDEO COMING: HOW WE EXTRACT SOIL SAMPLES FOR COMPLETE SOIL ANALYSIS
SEE OUR HOW TO HELP AND/OR CROWDFUNDING CAMPAIGN PAGE TO HELP CREATE ALL THE TUTORIAL VIDEOS FASTER
- Create a soil profile by excavating a ditch for visual examination and conduct a specific soil survey
VIDEO COMING: HOW WE CREATE A SOIL PROFILE AND CONDUCT A SPECIFIC SOIL SURVEY
SEE OUR HOW TO HELP AND/OR CROWDFUNDING CAMPAIGN PAGE TO HELP CREATE ALL THE TUTORIAL VIDEOS FASTER
SITE PREPARATION
Once the specific growing sites are designated, the next step is identifying the need for the following and implementing immediately and in the following order:
GRADING AND ROCK REMOVAL
Preparing the ground for planting often begins with grading and the removal of rocks. These tasks help create a stable foundation for planting, improve root development, and enhance soil drainage. Whether you are working with large garden plots or smaller areas like hoop houses, proper grading and rock removal are important first steps in creating a healthy and productive growing space.
ROCK REMOVAL
Rocks can often be useful in creating structures in a garden. They can be used to outline paths, build raised beds, or even build structures. If you utilize rocks, it is best to develop a plan for their use before removing them. Moving rocks is arduous work, limiting the number of times you have to move them is working smart.
Rocks can significantly disrupt root development and make planting very challenging. Removing rocks on site is the first step that should be taken in site preparation. The size of rocks to remove depends on how the site is being used. For large scale gardens, you’d want to remove as many rocks the size of an orange or larger as you can. For fruit forests and hoop house sites, you don’t have to be as meticulous because the rocks won’t have as big of an impact on root growth. At any of these sites, leaving smaller rocks can improve soil drainage and help prevent compaction.
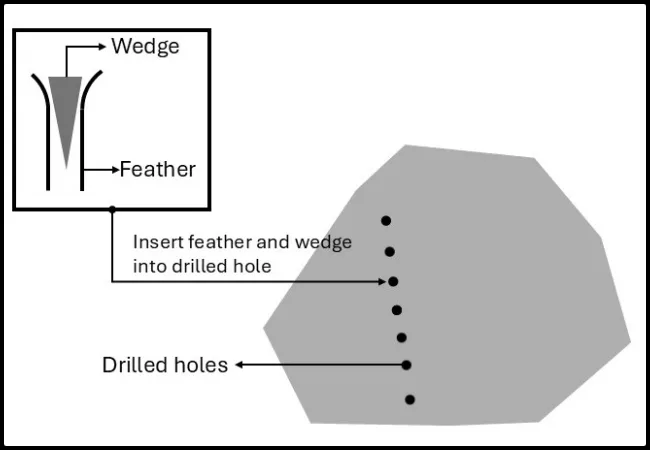
Depending on the size and amount of rocks, having access to a skid steer with a bucket and a rake attachment is very helpful, but it isn’t completely necessary. Start by removing large boulders first with the bucket attachment on the skid steer. If you are doing this by hand, it may be necessary to break the boulder into smaller pieces which can be done by following these steps :
- Remove as much soil around the base of the boulders as possible.
- Wearing eye protection, drill a line of holes in the boulder where you’d like it to split. The holes should be about ½” wide and 3” deep (see diagram below).
- Insert a wedge between metal feathers into each hole.
- Hammer the wedge between the feathers until the boulder begins to break. Repeat as necessary.
Once the boulders and larger rocks have been removed, the remaining smaller rocks can be removed using the rake attachment for the skid steer. This specialized rake will loosen any unwanted rocks within the top 8” of soil. If this step is done without a skid steer, remove all rocks visible on the surface by hand and then work the ground with a rake to loosen any other rocks just below the surface.
SWALES
 Swale creation is part of the One Community water conservation plan, large-scale garden strategy, and food forest design. For those that don’t know, a swale is a ditch and berm system designed to halt overland water flow and maximize water infiltration. Using surveying, grading, leveling, contouring, and rock removal (by hand or raking), ditches are excavated along the contour lines of a property such that the ditch is always following the level contour of the land. The soil excavated from the ditch is moved to the downslope side to form a berm. It is important to make sure that the top of the berm is level, in order to prevent accumulated water in the swale from finding a low spot and washing out the berm. The entire area is raked smooth, mulched, and densely planted with a broad mix of annual and perennial species. Note: In dry climates irrigation is necessary until plantings are well established. Allow native species 2-3 years for complete establishment and termination of irrigation.
“Swales are long-level excavations that come in many forms and widths. They can be just small ridges in gardens, or rock piles across a slope, or excavated hollows in flat lands and low sloped landscapes.”
~ Geoff Lawton

A properly designed and constructed swale accomplishes a number of important functions. First and foremost is the retention in the landscape of the maximum amount of precipitation or inflow. As the infiltrated water moves down and out through the soil profile, it enables the growth of trees and other plants upslope and downslope of the swales that would not otherwise survive on the site. The tree cover in turn shades and mulches the swale, maintaining and enhancing the infiltration; as the trees grow, their roots help guide moisture ever deeper into the soil profile. This synergistic feedback loop makes possible the reforestation or afforestation of even the driest regions. The system is expanded with additional swales upslope and downslope across the landscape.
 It is important to understand that a swale is NOT meant to direct or divert the flow of water across the slope. Rather, the design and intention of a swale is to HALT the flow of water, so that it collects in the swale and has the chance to sink into the soil. Understanding the soil structure where a swale is being considered is important to achieve the aim of maximum infiltration. On most soils, the mulch layer starts the generation of the soils microbiota, which improves the crumb structure and drainage of the soil. In the case of clay, treatment with gypsum (calcium sulfate) followed by mulch, will help the clay flocculate and achieve percolation. In extremely rocky or shale situations, mechanically ripping the bottom of the swale with a dozer shank may be necessary.
As a swale establishes its associated habitat, an accelerated turnover in species composition is seen. The initial annuals and short-lived perennials are soon shaded out by taller, longer-lived trees and shrubs, which in turn are succeeded by slower growing climax forest species. At each stage of this evolution, niches are created for new species, and “edge” increases at the peripheries. Properly managed, each of these niches is an opportunity for developing an ever-widening array of yields.

As a swale establishes its associated habitat, an accelerated turnover in species composition is seen. The initial annuals and short-lived perennials are soon shaded out by taller, longer-lived trees and shrubs, which in turn are succeeded by slower growing climax forest species. At each stage of this evolution, niches are created for new species, and “edge” increases at the peripheries. Properly managed, each of these niches is an opportunity for developing an ever-widening array of yields.

Tamera Eco Settlement Water Conservation Results: This Took Less Than 4 years
A VIDEO ABOUT WHAT IS POSSIBLE AND THE ABOVE PICTURE

As the systems of multiple swales extend towards each other, the management of the interswale zone can be maintained as an open meadow, agricultural field, home or village site, etc. Allowing these sites to be surrounded with swale-derived agroforest increases their soil moisture, reduces wind and evapo-transpiration, provides convenient access to wild foods, medicinal plants, and other forest yields. This approach brings Zones 3 and 4 closer to Zones 1 and 2 and, in the most well managed of instances can have truly transformational affects on the landscape as seen above.
SWALE SIZING AND CONSTRUCTION
 Swales are appropriate on slopes up to 18 degrees steep, and there is no minimum land slope for applying a swale. The size of a swale varies based on rainfall and catchment area, but a good starting point is 3-6 feet (1-2m) wide and should be large enough to hold water from a massive (100 to 500-year) rain event. When you are building multiple swales on a hill, they should be spaced out about 3-20 times the width of each swale. Another way to space out your swales is to make each one about level with the maximum height of a tree planted on the next swale down. The picture to the right is an example of this from Geoff Lawton’s Permaculture Certification Course.
The important thing is to make sure your swales can hold all the water from their respective catchment areas during large rain events so that they don’t break. The catchment area of a swale is the surface area that supplies water to the swale. To build a swale, dig into your hill and pile up the topsoil to create an area that will hold water. If you are on relatively flat ground, you will need to dig into the ground to create your swale. Continue along contour until you reach a point where the country is too steep to continue. To ensure that the back of your swale will not collapse, keep the slope of the back wall between a 50% slope down to 12%, depending on how loose the material is.
You should also size your swale to fit your property, so that in dry seasons they can be used to easily move equipment. The inside/uphill-side should be built flat and wide enough for the equipment you’ll be moving through this area. On smaller properties, this may be just large enough for a wheelbarrow. On larger properties, you may need it to be big enough for a small or even large tractor.
Swales become stable systems after varying amounts of time, from 8 years in wet tropics, 10 in subtropics, and 12-15 in cool-to-cold climates. When you first build your swales you should plant trees and with other support species, cutting the support species regularly to provide mulch.
Swales are not recommended in places where:
- The slope is greater than 18 degrees
- There is little to no evaporation (where they’re not needed)
- In places with a short growing season and low sun angle, such as the Arctic Circle
- In waterlogged zones, swales become chinampas
SPILLWAYS
Spillways are important to prevent erosion by safely discharging water when the water level gets too high. Spillways should be built at the water level that you want to maintain. When water begins hitting the spillway, it needs to start flat and quickly spread out to diffuse water pressure until it escapes and flows down the hillside. Spillway size is calculated based on the size of the catchment area.
To calculate the size of a spillway, first find the size of the catchment area and multiply it by the record 24-hour rainfall event to get the biggest waterflow the spillway will need to handle. Then divide by 86400 to get the per-second flow. To visualize this flow, you can convert it into liters (1000 liters per cubic meter) and use 1-liter bottles to estimate the size of your spillway. For maximum safety, calculate the size of swales and spillways without a runoff coefficient. You may also want to consider increasing the size of your spillways by 20% or more as a buffer.
Note: Use of metric units is highly recommended because it is so much easier.
.
HÜGELKULTUR BEDS
One Community will also be installing hügelkultur beds in the depressions and swales on the property. They are created by adding downfall, large limbs and other deadwood to natural depressions or inside the swales and then covering the deadwood with soil. It can then be planted with vegetable crops (potatoes, zucchini, radish, peas, lettuce, carrots, tomatoes, etc.). Here is a graphic describing the complete process:
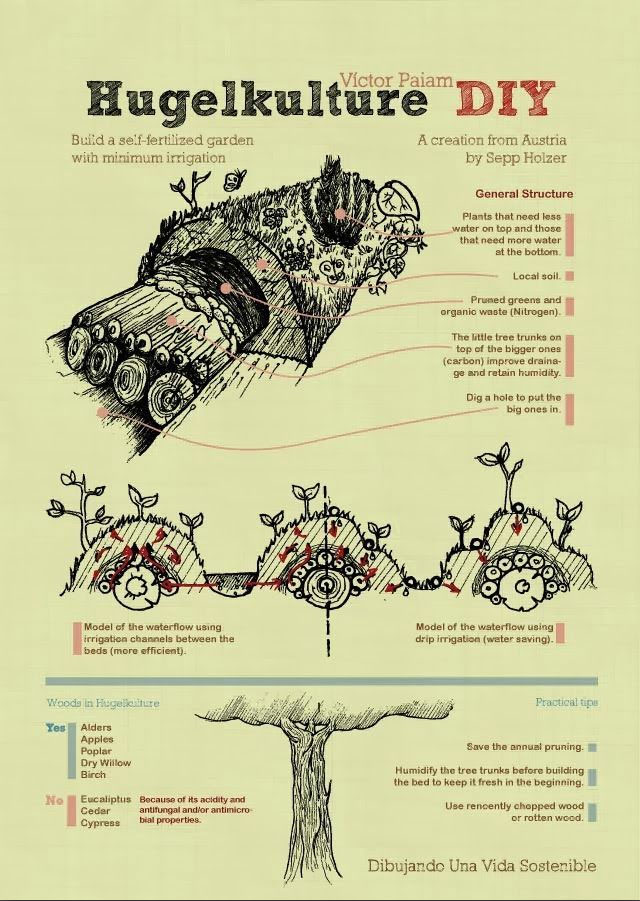
North-side plantings seem to have better tasting crops according to Permies.com, it is said that the south and southwest side crops of a hügelkultur bed are slightly bitter. This process significantly reduces water requirement too. One limitation of using hügelkultur beds may be the lack of adequate soil for covering the beds, but that can be changed over time. Legumes planted over the hügelkultur beds will contribute nitrogen that would replace the tied up nitrogen in the initial construction of the beds. Wood is high in carbon and will consume nitrogen for composting. This could lock up the nitrogen and take it away from what we are growing. But well rotted wood doesn’t do this as much. If the wood is far enough along, it may have already taken in so much nitrogen that it is now putting out nitrogen! See these links for additional info: http://www.richsoil.com/hugelkultur/ and https://permies.com/f/117/hugelkultur. This Paul Wheaton 3-Part Podcast “Hugelkultur Listener Questions With Cassie” Part 1, Part 2, and Part 3 are resources we also found very valuable and worthwhile.
Here’s a hügelkultur video we consider to be very helpful and informative:
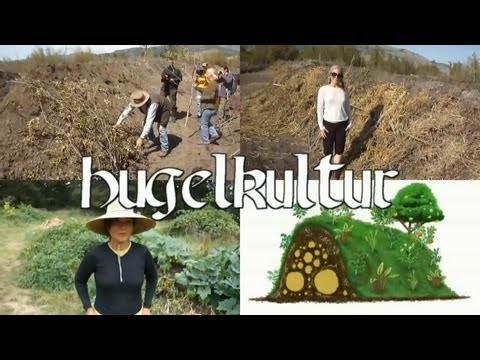
Chipping and shredding of dead wood, limb-ups from our ladder fuel removal of the fire prep work, pruning cuttings, corn stalks, etc. can all also be utilized for soil enhancement. Depending on the size of your chipper/shredder, you can run all possible organic matter through the machine. This soil enhancement is especially important for soils containing a high percentage of sand because a substantial amount of organic matter is necessary to enhance both water retention and soil fertility. Therefore collection of other existing organic material like leaves (from our deciduous trees), domestic animal manure (from goats, chickens and rabbits), and vermiculture compost should also be gathered and stockpiled in convenient locations to the growing sites.
Hügelkultur built over 6′ tall are recommended by Paul and so is planting them with your cover crops as soon as possible to keep weeds from establishing themselves first.
COVER CROPS
 Due to on-site convenience and not having to transport materials from off-site, seed planting of cover crops (green manure) is a highly efficient multi-purpose and important management tool regarding the management of soil fertility and quality, water, weeds, pests, diseases, biodiversity and wildlife in an agroecosystem. This will be a high priority in our soil preparation process and will consist of the following choices and volumes of seeds purchased from Territorial Seed Company (prices accurate as of February 2019):
- Buckwheat (Fagopyrum esculentum). Recommended seeding rate: Sow 1 pound per 500 square feet; 50 pounds per acre. 150 lbs (organic) $331.35.
- New Zealand White Clover (Trifolium repens). Sow 1/4 pound per 1000 square feet; 6″10 pounds per acre. Pre-inoculated. 50 lbs. $ 318.25.
- Yellow Blossom Sweet Clover (Melilotus officinalis). Sow 1 pound per 1000 square feet. Pre-inoculated. 50 lbs. $206.75.
- Crimson Clover (Trifolium incarnatum). Sow 1/4″1/2 inch deep spring, summer, or fall. Recommended seeding rate: 1″2 pounds per 1000 square feet; 30″40 pounds per acre. Pre-inoculated. 150 lbs. $612.00.
- Berseem Clover (Trifolium alexandrinum). Recommended seeding rate: 1 pound per 1000 square feet; 15″20 pounds per acre. Pre-inoculated. 50 lbs. $204.00.
- Mammoth Red Clover (Trifolium pratense var. sativum). Sow 1/4-1/2 pound per 1000 square feet; 20 pounds per acre. Pre-inoculated. 50 lbs. (organic) $318.25.
- Mighty Mustard® Trifecta Power Blend➢ (Brassica juncea). Sow spring to summer at ¼ pound per 1000 square feet; 6-10 pounds per acre. 25 lbs. $127.50.
- Groundhog Daikon Radish (Raphanus sativus var. niger). Recommended seeding rate: 3/4 pound per 1000 square feet; 10-12 pounds per acre. 25 lbs. $122.65.
See the following links for additional information:
Cover Crops Basics | Territorial Seed Company Purchasing Info and More | Cover Crops on Wikipedia
ORCHARD PRUNING/PLANTING
Orchard pruning and planting are best conducted in late winter/early spring (February/March) and is temperature & weather dependent. As we walk the property a comprehensive orchard assessment will be conducted. Existing trees will be identified, dead trees will be tagged for removal, and damaged trees will be marked with an explanation for bringing them back to health. Fencing requirements, critter damage prevention, pruning needs, mulch, irrigation, weed/grass mowing, and a planting plan for the following spring, etc. will also be outlined.
COMFREY
Other than Alaska and the southern tip of Florida, comfrey will grow most anywhere in the U.S. and can be planted whenever you can work the soil. Comfrey leaves are a good nitrogen source, tolerate cold climates, and prefer good drainage. Fruit trees such as apple, apricot, peach, pear, plum, persimmons and nectarine are good companion plants for comfrey. Its deep root system extracts nutrients into its leaves which are then harvested by the chop and drop method and spread under the trees as a nutrient-rich mulch. With this in mind, we will grow a significant amount of comfrey under the trees in the orchard as a living mulch. One comfrey plant per tree is adequate, but we will grow more for mulching there and elsewhere.

Other comfrey uses include edge plantings, activator in our compost piles, liquid tea plant fertilizer, medicinal salve compress, medicinal tea, chickens fodder, decorative flowers, etc. Because comfrey grows rapidly it can be harvested multiple times during a growing season. Non-sterile varieties can easily spread and one containment method is building a compost pile on top of the comfrey. Symphytum x uplandicum (Russian comfrey, Bocking 14 cultivar) is sterile, controlled by root division, and will not go to seed. It prefers a rich, moist soil in full sun, but will tolerate some shade.
Want to learn more? The following links and videos are the best we’ve found and offer considerable information about uses, planting, harvesting, and propagation of comfrey.


FENCING
The primary objective for fencing is minimizing wildlife crop damage. It should be constructed for easy transport of equipment and vehicles through gates and for the convenience of cultivation, harvesting, and maintenance; remembering to allow adequate space for maneuvering equipment at end rows. Complete fencing of a food production area able to grow sufficient food to feed 100 people within 1 year will require 3 acres of fencing if all food acres can be located in the same area. Four or more acres may need to be fenced if maximally efficient growing turns out to be impossible. Fencing options include wire fencing, plastic mesh fencing/netting, and green fencing. Possible options for green fencing include caragana, sea buckthorn, prickly pear cactus, etc. where the density and thorns of the green fence act as a deterrent. A dense green fence also serves as a windbreak and helps combat erosion.
IRRIGATION
There is no way around it, you will have to provide supplemental watering to your garden. This can become the most time consuming task while also having potential to cause the most harm. That is why considering water source and availability during site selection is so important.
The amount of water needed can be effectively lessened by choosing plants that are native to your area and can handle the climate’s average rainfall and by providing a well draining, nutrient rich soil. But even so, some supplemental watering will still be needed. Before setting up an irrigation system you must first identify your water source.
WATER SOURCES
Reliable access to water is essential for any successful gardening or food production system. Whether drawing water from a well or using a utility service, it is important to understand the options available, evaluate water quality, and ensure your system can deliver consistent irrigation. Proper water planning supports plant health and long-term sustainability.
WELLS
Wells are a common source of on-site water for gardening and agriculture. When using a well, it is important to evaluate both the water quality and the depth of the water table. Proper testing and planning ensure that the water is safe for plant use and that the well can be accessed safely based on the site’s geological conditions.
- Water test: prior to planting, test your water. A filtration system will be needed if there is a high mineral, sodium, iron, or heavy metal content
- Digging a well: this should only be done yourself if your water table is no more than 25’ below surface and the soil conditions are primarily clay or sand. A deeper well or difficult geological formations should be handled by someone with specialized equipment and expertise.
UTILITY WATER
Utility water is sourced through a public water supply and can be a reliable option for many growing environments. This type of water is typically treated and monitored, but it is still recommended to test it before use. Planning water access points in your garden setup ensures efficient and consistent irrigation throughout the planting season.
- Water Test: prior to planting, test your water. Often Utility companies conduct these tests themselves and will be able to provide data.
- Install a water bib/ source adjacent to your planting site
VIDEO COMING: HOW WE TESTED OUR WATER AND WHAT WE DID WITH WHAT WE LEARNED
SEE OUR HOW TO HELP AND/OR CROWDFUNDING CAMPAIGN PAGE TO HELP CREATE ALL THE TUTORIAL VIDEOS FASTER
WATER COLLECTION
Water collection plays an essential role in sustainable gardening by capturing and storing water from natural or mechanical sources. Whether from rainfall, stormwater runoff, or condensation, collecting water reduces dependency on external systems and ensures water is available for irrigation when needed.
- Rainwater collection: collection of rainwater and storing it in tanks or cisterns. Setting up gutter systems to catch water coming off of building structures and empty into storage tanks is the most effective way to collect rainwater.
- Stormwater collection: water that falls on hard surfaces or does not infiltrate the ground immediately. This water can be directed to a swale or can be directed to an underground well or aquifer.
- Condensation Traps: water can be collected from anything that produces condensation. Most commonly this is seen in air conditioner condensation traps. Setting up a tank to catch the water coming from a condensation trap has the potential of collecting 5-20 gallons of water a day.
Once you have identified your water source you can develop an irrigation system. An irrigation system supplies water to your garden. In order to have efficient irrigation that will give plants what they need while conserving water and preventing plant stress, you must understand the different systems and their components.
WATER COLLECTION METHODS
Detailed section coming about the different ways we collect water for irrigation.
VIDEO COMING: HOW WE COLLECT WATER USING RAINWATER, STORMWATER, AND CONDENSATION SYSTEMS
SEE OUR HOW TO HELP AND/OR CROWDFUNDING CAMPAIGN PAGE TO HELP CREATE ALL THE TUTORIAL VIDEOS FASTER
IRRIGATION SYSTEMS
Once a water source has been secured, it’s important to choose the right irrigation method. Different systems deliver water in unique ways, and the right choice depends on the type of garden, plant needs, and layout of the growing area.
- Surface irrigation: uses gravity to deliver water to crops through canals, dams, or furrows. This is most commonly used in large scale gardens or fruit forests where plants are installed directly into the ground.
- Sprinkler Irrigation: uses pressurized pipes to spray water on plants. This is commonly used in hoop houses or in ornamental landscapes.
- Drip Irrigation: uses a network of pipes and emitters to deliver water directly to the base of plants. This system is very adaptable and can be used in several different garden styles.
VIDEO COMING: WHAT IRRIGATION SYSTEM WE CHOSE AND WHY
SEE OUR HOW TO HELP AND/OR CROWDFUNDING CAMPAIGN PAGE TO HELP CREATE ALL THE TUTORIAL VIDEOS FASTER
IRRIGATION SYSTEM COMPONENTS
Every irrigation system relies on a set of key components that work together to deliver water efficiently. Understanding these parts helps ensure proper function, conserve water, and avoid over- or under-watering your garden.
- Pump Stations: deliver water from the source to the irrigation system
- Controllers/Timers: Control the frequency and amount of water delivered to plant material
- Valves: divide the irrigation systems into zones. This is necessary in larger systems so that water pressure is maintained.
- Emitters/Sprinkler heads: component that delivers water to the plants. These vary in how much water they can deliver in a set amount of time and amount of coverage.
- Backflow preventer: prevents unsafe water from reversing flow and entering the clean water supply. Usually just a check valve that will close when water flow reverses.
- Pressure regulator: Maintains water pressure despite any fluctuations in the water supply.
VIDEO COMING: HOW AND WHY WE SET UP OUR IRRIGATION SYSTEM THE WAY WE DID
SEE OUR HOW TO HELP AND/OR CROWDFUNDING CAMPAIGN PAGE TO HELP CREATE ALL THE TUTORIAL VIDEOS FASTER
SOIL PREPARATION AND AMENDMENT
We are planning for soil that requires amendment to adequately grow for our needs. So we’re setting ourselves up to start the soil amendment process as part of the earliest phases of the food self-sufficiency rollout process. Amending the soil will increase the nutrient value and water retention, make the soil more healthy, and help prevent plant diseases.
This Gabe Brown video is an extensive discussion of his experiences using soil amendments. It is 2.5 hours long and a worthwhile investment of your time:
As discussed in the video above, a good quality compost is an excellent way to begin the soil amendment process. Initially we will open the soil using a garden spade to lift it and add 4-6″ of quality compost while keeping the topsoil in place. Then we’ll add over this several inches of well-aged manure that we’ll slightly rake in, leaving the majority of the manure exposed as the surface layer of compost.
It is not necessary to mix the compost deeply into the soil. Mother Nature and her earthworms will take care of that process. We will mulch with hay on the planted areas and wood chips on the pathways as this will retain the moisture. Planting occurs below the mulch and in the compost. Green manures or cover crops will be grown and cut, leaving the roots in the soil, and yearly we will add 2-4″ of new compost/manure and straw to the top of our planting beds. This no-till method will improve the soil without the tilling that many believe decreases soil productivity by killing beneficial microbes and bacteria.
The following three-part progression videos are from Back To Reality. This first 8-minute video shares the labor comparisons for a hügelkultur bed and the Ruth Stout method of hay mulching. Both are effective ways of growing crops with hügelkultur beds requiring a considerable time and labor input up front. Stout’s hay mulching method requires minimal time and labor investment initially and is repeated twice yearly. The first minute and 45 seconds of this video is a quick lesson in hugel bed construction while the remainder is devoted to the Stout method, a well done video.
This is a 9-minute update video taken in the spring after a no-dig fall garlic planting and before the first full summer growing season leading to harvest. Typically this method requires a layer of hay in the fall and again in the spring.
This is a follow up from the previous video depicting the positive garlic results and focuses on the harvesting and drying of garlic. Had they applied more hay initially, they probably would not have had a weed problem. Remember to use organic hay or grass and try to cut it before it goes to seed

GENERAL SOIL AMENDMENT STRATEGY: LARGE SCALE GARDENS
Generally, loamy soil is ideal for large scale gardens aimed at producing produce. Loamy soil is a combination of sand, clay and silt. This combination creates a soil that is rich in nutrients and holds moisture while being able to drain well.
STEP 1: DETERMINE THE EXISTING SOIL PROFILE OF YOUR SITE
Understanding your soil’s current condition is the foundation of a successful amendment strategy. By identifying key characteristics such as pH, texture, compaction, and nutrient levels, you can make informed decisions about how to improve soil health and structure before planting.
pH: soil for vegetable gardening is best kept in a pH range of 6.0-7.0 (7.5 acceptable)
- pH affects the way plants take up nutrients
- Lower pH=higher acidity/ higher pH= higher alkalinity
- Generally, sandy soils have a low pH and heavy clay soils have a high pH)
- To raise pH add lime, to lower pH add aluminum sulfate.
- It is imperative to get your soil’s pH right away. Changing the pH must be done prior to planting and can take weeks to several months to get within the correct range.

Click for source spreadsheet
Soil texture
- Soil texture refers to the makeup of your soil
- Understanding the texture allows you to understand the drainage and moisture retention.
- It can be determined by a simple hand test:
Soil Compaction
- Compacted soil makes it hard for roots to establish and beneficial fungi to flourish
- When vegetable gardening you want an 8-12’ depth of sifted/non compacted soil
- Signs of compacted soil could be a hard crust-like surface, difficulty digging, and poor water drainage
- Soil compaction is best treated through the addition of organic material tilled into the top 8”. Type of organic material and quantity needed can be determined from the results of a soil test (see below).
- Soil compaction can be avoided by not working the soil while its wet and alternating plants. Alternating plants allow for different root structures to break up the soil naturally.
Soil Test
- It is strongly recommended to get a soil sample and submit it for testing to determine what the nutrient makeup is of your soil and if there are any residual toxins.
- Soil tests can easily be obtained through your local agriculture supply store or extension office
Here’s a DIY flow chart for testing your own soil too. This isn’t nearly as good as professional testing, but it is better than nothing.

DIY Soil Test Flow Chart – Click to enlarge
STEP 2: AMEND SOIL
After evaluating your soil, the next step is to make the necessary adjustments to improve its suitability for growing. Amending the soil involves addressing issues like pH imbalance, nutrient deficiencies, and physical structure to support strong plant development.
Remove any visually large rocks and debris
If needed, amend pH.
- Adding Lime: 40lb/1000 sqft raises pH by 1. If pH needs to be raised more than 1, wait a month between applications. Lime needs to be worked into the soil and then watered in to activate.
- Adding Aluminum Sulfate: 20lb/1000 sqft decreases pH by 2. If pH needs to be decreased by more than 2, wait 3 months between applications. Aluminum sulfate needs to be worked into the soil and then watered in to activate.
Once the soil is in the acceptable soil range, work recommended organic material into top layer of existing soil
- When establishing a vegetable garden for the first time, it is acceptable to mechanically till in organic material in order to create your desired soil profile. Once soil profile is established tilling should be avoided as it disrupts the natural layering and micro ecosystems that exist in the soil profile.
STEP 3: MAINTENANCE
Maintaining healthy soil ensures that the improvements you’ve made continue to support plant growth over time. This includes seasonal care, nutrient replenishment, and practices that protect soil structure and prevent compaction.
Cover Crop
- Planting a cover crop between seasons is highly advisable. Cover crops have many attributes to include weed suppression, nitrogen fixing, improving water filtration, and improving nutrient availability and soil structure.
- If using a cover crop is not an option, at the very least mulch between seasons
Annual amendment
- Replenish your soil after each planting by topdressing with organic material. If planting back to back, ensure your organic material has been composted so it does not burn your new crops
Avoid compaction
- Install designated pathways throughout the garden to keep foot traffic to designated areas.
- Avoid working the soil while its wet
- Alternate planting locations to allow for different root structures to break up the soil.
* This is a general guide to amending soil for a vegetable garden, it is best to know the plant you’re growing to understand its specific needs. If you are using native plants, soil amendment will be minimal and any amending could be detrimental.
VIDEO COMING: HOW WE AMEND AND MAINTAIN SOIL FOR LARGE-SCALE VEGETABLE GARDENS
SEE OUR HOW TO HELP AND/OR CROWDFUNDING CAMPAIGN PAGE TO HELP CREATE ALL THE TUTORIAL VIDEOS FASTER
GENERAL SOIL AMENDMENT STRATEGY: HOOP HOUSES
In addition to soil, there are several other components to the makeup of the growing mixture used in hoop houses, for this reason we will refer to the soil as a media in this strategy. While the type of media used in hoop houses is dependent on the life stage of the plant, there are several commonalities in whatever media you use. The media used needs to be sterile, well draining, and have low fertility.
HOOP HOUSE MEDIA PROFILES
Different growing conditions may call for different soil media blends. The choice of materials often depends on the type of plant being grown, the stage of development, and specific environmental factors such as humidity, temperature, and drainage needs. Understanding these variables helps in selecting the best blend for seed propagation, cutting propagation, or supporting established plants in a hoop house environment.
SEED PROPAGATION
Typically a 2:1:1 blend of sterilized soil, sand or vermiculite, and a peat moss. Peat moss provides water retention and should be adjusted depending on climate.
CUTTING PROPAGATION
Typically a 1:1:1 blend of sterilized soil, sand or vermiculite, and a peat moss. Sand or vermiculite may need to be adjusted to allow for better drainage
ESTABLISHED PLANTS
Much like soil for vegetable gardening, a loam soil is preferred. Typically a ratio of 60% sterilized soil, 30% compost, and 10% peat moss is ideal, while compost may need to be adjusted depending on the age of the plant. The younger the plant, the less compost.
STERILIZED SOIL
Sterilizing soil is essential for maintaining the health of plants in a hoop house environment. It helps prevent the spread of pests and diseases, especially in enclosed systems where issues can escalate quickly. Clean soil ensures stronger propagation and healthier plant development.
PROPAGATION
Whether established by seed or cutting, plants are most susceptible to pests at the early stages. Ensuring your soil is sterilized will help prevent any pest related issues.
ESTABLISHED PLANTS
Because most hoop houses are enclosed environments, it is very easy for pest issues to spread and become a big problem. Ensuring your potting soil is sterilized helps prevent any outbreaks.
HOW TO STERILIZE SOIL
Heat: heat soil to a temp of 180°F for 30 minutes
Solar radiation:
- Find a sunny location, best done in summer months, for soil excavation (or placement if solarizing recycled soil)
- Irrigate soil to be solarized
- Cover soil with clear plastic, ensuring no room for air bubbles between plastic and soil, and secure
- Let soil sit under plastic for 8-12 weeks before using
WELL DRAINED SOIL
Amending soil to improve drainage is especially important in controlled environments like hoop houses. A well-drained soil medium supports healthy root growth, prevents waterlogging, and reduces the risk of fungal issues. Additives such as sand, vermiculite, and peat moss can be used to achieve this balance.
SAND/VERMICULITE AMENDMENT
- Sand/vermiculite will help a media drain water, the more you add the less water retention you will have. Less water retention is needed in propagation and seedlings- whenever the plant does not have a root structure to absorb lots of water
- Sphagnum or Peat moss is added to the media to help with water retention and allow for aeration. In a hoop house plants are irrigated mechanically, planted in containers and tend to dry out faster. Increasing the amount of sphagnum or peat moss in your mixture as plants age and have a more developed root structure will minimize irrigating and stress for your plants.
LOW FERTILITY
This is most important in propagation and younger plants. Having a media that is nutrient rich or contains a lot of organic material can adversely affect young plants because they are unable to process the nutrients.
VIDEO COMING: HOW WE PREPARE AND MANAGE SOIL MEDIA FOR HOOP HOUSE GROWING
SEE OUR HOW TO HELP AND/OR CROWDFUNDING CAMPAIGN PAGE TO HELP CREATE ALL THE TUTORIAL VIDEOS FASTER
GENERAL SOIL STRATEGY: FRUIT FORESTS
Most fruit trees prefer a loamy soil, similar to the soil discussed in the large scale garden strategy. The difference is application. With a large scale garden you are amending an entire plot of land, with fruit trees you are amending the hole and immediate surrounding area you are planting in.
PLANT SELECTION
Choosing the right trees for your local climate is essential for fruit forest success. Selecting native or well-adapted species reduces the need for soil amendment and ongoing maintenance while increasing plant resilience.
DETERMINE SOIL PROFILE OF YOUR LOCATION
Before planting, it is important to evaluate the soil where your fruit trees will grow. Checking the pH range and compaction level ensures that your trees have the right environment to absorb nutrients and establish strong roots.
- pH: as with vegetable gardening, it is important to ensure you have a pH with a range of 6.5-7.5
- Compaction: in order for trees to be successful, the soil they grow in needs to be somewhat aerated.
AMEND SOIL
After assessing the soil, make necessary amendments around the planting hole. These changes help optimize root development, water retention, and overall soil structure, giving your trees a better chance to thrive.
- Adjust pH as needed: adjust pH
- Address compaction issues
- Amend planting hole
- Earthen water well
- Mulch
MAINTENANCE
Ongoing maintenance is key to supporting tree health after planting. Learn to recognize what each plant needs and monitor for signs of nutrient deficiencies or stress so you can adjust care as needed.
- Familiarize yourself with signs and symptoms of nutrient deficiencies and adjust as needed
VIDEO COMING: HOW WE AMEND AND CARE FOR SOIL SPECIFICALLY FOR FRUIT TREES USING FRUIT FOREST STRATEGIES
SEE OUR HOW TO HELP AND/OR CROWDFUNDING CAMPAIGN PAGE TO HELP CREATE ALL THE TUTORIAL VIDEOS FASTER
WORMS AND VERMICULTURE COMPOSTING
Worm farming is an important foundation of our soil amendment strategy too. The dynamic role worms play in creating and maintaining a healthy soil means we’ll begin this process as one of the first steps of the food self-sufficiency rollout process. Under the right conditions worms appear on their own and mother nature puts them to work processing food scraps, leaves, insects, and other organic matter. To further build our worm population, we will practice vermiculture composting (composting with worms) the majority of the year. This method includes vermiculture farms and trench composting and is a much simpler and far less labor intensive process than regular composting.
Vermiculture worm bins will sited for inclusion by our composting area(s), inside our hoop houses, and anywhere else they can be useful and effectively managed. For longterm use, we will construct worm bins from pallets to provide 3 bins per every 180′ of hoop houses, located at the 30′, 90′, and 150′ intervals. That will mean a maximum distance of 30′ to any bin from anywhere in the hoop house. Others will be set up in the orchard area for leaves, grass, and small twigs; as well as in the food forest for a quicker breakdown of organic matter so we can utilize it wherever needed. Composting of kitchen scraps and some cardboard/paper products will also be integrated short-term with longterm strategies including large-scale collection at the Duplicable City Center and development and use of vermiculture toilets.
Learn more at these links below:
WORM TYPES
The worms most people are familiar with are earthworms (Lumbricus terrestris). These common worms travel vertically throughout the soil eating their way through organic material, creating burrows for water penetration, oxygenating the soil, and providing easy root ways for plants to absorb nutrients through their root systems. More often recognized as composting and bait worms are the red wigglers (Eisenia fetida or Eisenia andrei) that travel horizontally and usually in the first 2-3 inches of soil. Both types grind through the organic matter producing nutrient rich castings that act as a high-density nutrient fertilizer.
Some people are adamant about using red wigglers and others say using common earthworms is fine. We will utilize both, but here is an article titled “Differences Between Red Wrigglers & Earthworms” that discusses the differences and will help you decide for your circumstances. The video below is also a great source of information and discusses red wigglers, two different types of earthworms (African Nightcrawlers & European Nightcrawlers), and Alabama Jumpers.
THINGS TO AVOID WITH WORMS
Like any living creature, worms benefit from proper care. Avoid the following as all of these can kill your worms:
- Excessive heat by adding too much organic green matter (worms prefer 40-70°F temperature)
- Lack of drainage that can lead to drowning
- Inadequate food supply
- Lack of oxygen
- Food poisoning by eating moldy refrigerator scraps
WORM CONTAINER & FEEDING OPTIONS
Proper feeding is also important. Worms eat a substantial amount of food in a very short time and it is better to feed your worms more frequently with lesser amounts. Many worm farms are made from PVC or plastic storage containers/buckets. In this video, Geoff Lawton provides a simple explanation of the benefits of red wiggler worms and worm towers.

Worm towers are especially effective when composting in a closed bed, though they are still beneficial in any garden setting. The system is fed by table scraps and then composted by worms, creating both worm castings and a worm juice fertilizer. The liquid fertilizer automatically feeds the plants during the digestive process by the worms. This method works best for warm climates or partial use in a region with cold winters. In a colder environment, a normal compost pile is the alternative unless you bring your worms indoors, then a basement is a good location but you must feed them regularly and not allow them to freeze. A single incandescent light bulb can supply all the necessary heat if they are in a small room.
“Abled Gardener” demonstrates her worm towers using 5-gallon buckets in the video below. The buckets are less expensive than PVC, often free, and easy to construct. All one needs is a 5-gallon bucket, a shovel, and a drill with a ½” waffle bit. Drill holes in the bucket, excavate the hole and add some composted manure and a handful of paper scraps in the bottom of the hole. Next, sink the bucket into hole, add a bit of composted manure in the bucket, then kitchen scraps, paper, leaves, and grass clippings. Moisten with water, mix, add coffee grounds, ground egg shells, shredded paper, water, leaves, kitchen scraps, etc. Mix and water again, cover with a lid, and secure with a rock.

Here’s Abled Gardner’s update on her worm towers where she empties them and restarts the process. Once the worms leave, harvest/remove the compost and sift or apply it around the base of your plants as a fertilizer.

Here is another gardener’s worm farm construction steps (with the source video below):
- Drill 3/16″ (5mm) holes all the way around a large PVC pipe throughout the lower ⦝ to ¾ of the pipe
- Dig a hole and place the pipe into the hole so all holes are below the ground surface and then backfill around pipe without tamping
- Place a few handfuls of compost at bottom of pipe
- Throw in a dozen or so red wiggler worms and add more compost. If you don’t have any worms you can wait for the earthworms to enter through the holes on the pipe, the advantage of the red wigglers is they expedite the composting process and remain within the top 3″ of the pipe surface
- Add a handful of hay mulch – this helps keep the temperature stable
- Position an upside down bucket over the pipe to keep rain, rodents, and insects out
- Check it every several days and renew with additional compost, hay, green matter, etc. and let the worms do the rest
- Mulch around pipe to help keeps the ground cool and moderate the temperature inside the pipe

If you are opposed to utilizing plastic, one gardener used wooden boxes as described here: “One of the most successful housing units I had for raising worms was just a 2′ x 2′ square box I made with some 6″ wide boards. I laid this box on the ground where I wanted the worm farm to be (any place that is shaded all day to keep it cool), and ‘traced’ around it with my shovel, moved the box out of the way and removed the topsoil below it down to a depth of 4″. I stapled some old screening to the bottom of the square box (cut the screening from an old damaged window screen), and then set the square box down into the 2′ x 2′ wide hole. The screen on the bottom of the box allows rain to drain away so the worms don’t drown in a heavy rain, yet keeps the worms from crawling away. This will also leave 2″ of the top edge of the frame exposed so I can easily lift the box out of the hole to check on the worms and harvest worms when I want to. To fill the box, I first add an inch of a peat moss and good natural soil mix, then only a dozen or so worms, then the food materials, with the shredded paper on TOP. You want to make sure that any food scraps are covered to deter flies and other flying insects. I add just a quick gentle spray of water to moisten the contents a little and you’re good to go. A dozen worms can eat up to an inch or two of food in a day, so again, food MUST be replenished regularly. On really hot days or during really dry periods, it always helps to water your worm farm periodically as long as there is a way for the water to drain away.” This comment is from the comment thread under this video that we share here because it’s a good one for smaller home worm farms:

Another alternative is worm attraction. Mulch your entire garden not only for reducing evaporation but for activating the soil life and creating a dark, moist microclimate for worms. They thrive in such a situation. If you have large quantities of organic matter, scatter it under the mulch. If a rodent problem exists, excavate a trench and bury the scraps. Either way, it will all disappear and turn into a nutrient rich addition in the form of worm castings and worm tea for your growing area.
WORM TRENCH COMPOSING
Trench composting is another form of worm attraction. This 24-minute video is entitled “Trench Composting,” but probably should be renamed “Hole Composting” as the materials added are placed in a minimum 2′ deep hole 1′ in diameter, and not a trench. Regardless, the process and the producer’s thoughts and opinions discussing the animal and plant ingredients for hole composting are helpful. The emphasis is on kitchen and garden nitrogen/carbon items, some common items not to compost, and a worm comparison explanation. There are some who believe the ingredients should be closer to the surface and not placed so deeply into the hole. He also adds some items that others do not recommend—add what you wish and you will quickly determine what your worms will consume. View the entire video and determine how your practices can be integrated with the worm composting process.

At One Community we will compost primarily by placing composting materials in progressive trenches throughout the garden and mulching them with straw as well as utilizing the various worm farms described above. We see this as minimizing labor over the general composting method, though the winter season will find us utilizing a general compost pile too. We describe this in the next section.
REGULAR AEROBIC “HOT” COMPOSTING

The Layers and Stages of Composting
We will use regular aerobic “hot” composting in the winter months when vermicomposting is not effective. This method is slower and more labor intensive than vermicomposting and will not yield compost fast enough to help prepare the large-scale garden area for initial planting. It will, however, be an important contribution to soil fertility in subsequent growing seasons.
The process of making compost, (as opposed to making humus, which many people mistakenly believe is compost) involves a specific formula and series of steps to maximize efficiency. The first step is particle sizing. Larger materials must be shredded or crushed into individual particles that are ⦺” to ¼” in diameter, in order to achieve a high surface area to volume ratio. These materials must then be blended in a ratio of between 4:1 to 5:1 of “browns to greens” that represent carbon and nitrogen respectively – a more specific ratio is in the Advanced Composting Techniques section below.
This means that four to five parts of a high-carbon material such as sawdust, ground tree trimmings, shredded cardboard, etc. are mixed with one part nitrogen-rich materials such as green grass clipping, animal manures, green leaves, etc. All materials must be thoroughly moistened as they are mixed and the final pile should be at “field capacity,” the level at which it will not soak up any more water, but instead begins to have water running out of it.
We discuss composting further in these sections below:
- Additives For Speeding Up The Composting Process
- Things To Avoid When Composting
- Turning/Oxygenating Your Pile
- Advanced Composting Techniques

ADDITIVES FOR SPEEDING UP THE COMPOSTING PROCESS
Here’s a partial list of additional possible compost ingredients (not already mentioned above) for kickstarting the soil’s fertility:
- Cotton gin waste (should tested for pesticide residues first though – cotton is heavily sprayed)
- Lumber milling waste (bark and sawdust)
- Grain mill waste (rice hulls, wheat chaff, etc.)
- Grass clippings
- Spoiled hay
- Slaughterhouse waste
- Seaweed or freshwater algae
- Bone meal
- Granite dust
- Mycorrhizal inoculants
THINGS TO AVOID WHEN COMPOSTING
While most anything can be thrown into your compost pile there are some items that are better than not, but in many cases it is just a matter of time to break down the ingredients. Refrain from adding these:
- Dog and cat excrement
- Tea and coffee bags
- Citrus peels and onions
- Fish and meat scraps
- Glossy or coated paper
- Sticky labels on fruits and vegetables
- Coal fire ash
- Sawdust from treated wood
- Large branches
- Synthetic fertilizer
See this link for further information and why you should not compost the above: Article: “10 Things You Should Not Put In Your Compost Pile”
TURNING/OXYGENATING YOUR PILE
The next key ingredient is oxygen. A moist pile of organic materials, with the correct nitrogen/carbon ratio, will heat up quickly from bacterial and fungal activity. These microorganisms require oxygen to live, so it is important that sufficient oxygen reach the interior of the pile to allow them to thrive and do the work of digesting the organic material into the target compost. This oxygenation is accomplished by turning the pile, making sure that the inner and bottom layers are removed and mixed with the upper and outer layers. Moisture levels are also checked and if necessary adjusted during turning, taking care to ensure that there are no dry spots developing in the pile that could overheat and begin to burn.
As the pile begins “cooking” it will attain temperatures as high as 170-180°F (76-82°C) range. For maximum efficiency, this should be monitored with a temperature probe so it can be maintained between 130-160°F (48-71°C). This is important because there are a staged series of particular organisms that are responsible for initial heating. Their propagation is suppressed/reduced by the pasteurization temperatures created in the pile, and another set of thermophilic (heat-loving) organisms can begin dominating the pile. Turning the pile keeps the temperatures down and helps address this while also redistributing the working organisms throughout. This avoids a layering effect in which the core is fully digested, but the outer shell of the pile is still in a raw state.
Another very important reason for oxygenating the pile is that if the cascade of composting organisms is deprived of oxygen and begin dying off, there is another group of anaerobic organisms whose population will bloom and begin to ferment the material. Signs of this are strong odors of sulphur or sewage. While this material can still be used as a soil amendment, it is of a different nutritional/chemical composition and is not as useful for long-term soil improvement as aerobic “hot” compost.
ADVANCED COMPOSTING TECHNIQUES
There are many advanced composting techniques that we will be using also. We will buy and/or use a chipper/shredder to create wood chips to place on pathways and for mulching throughout the community. Green manure we will source from our chickens and goats while comfrey will be grown adjacent to and in the garden, within the orchard , and near the compost piles and composting area as a nitrogen source used specifically to break down the carbon sources in the piles and as a mulch and nutritional additive in the garden.
We will also adjust our carbon and nitrogen sources/ratios much more specifically. The 4:1 to 5:1 of “browns to greens” ratio described in the introduction above is a very general rule that doesn’t take into account the actual carbon-to-nitrogen ratio of specific compost ingredients. This article, “Carbon-to-Nitrogen Ratios” has a chart with examples of actual C:N ratios of various compost options. This article, “The Carbon Nitrogen Ratio (C:N)” talks about how compost scientists have determined the fastest way to produce fertile, sweet-smelling compost is to maintain a C:N ratio somewhere around 25 to 30 parts carbon to 1 part nitrogen, or 25-30:1.
If the C:N ratio is too high (excess carbon), decomposition slows down. If the C:N ratio is too low (excess nitrogen) you will end up with an odoriferous pile. And the commonly discussed 4:1 to 5:1 of “browns to greens” ratio is only a rough estimate to keep things simple for the average gardener not interested in the actual science. That said, many home gardeners prefer to put up with a slight odor and keep some excess nitrogen in the pile, just to make sure there is always enough around to keep the pile “cooking.”
To create our initial compost piles, we’ll alternate layers of carbon rich materials and nitrogen laden matter, watering between layers. As stated above, carbon-rich materials and include wood chips, hay, straw, branches/twigs, dead shredded leaves, etc. The green materials release nitrogen and include grass clippings, kitchen & garden scraps (especially good when mixed with leaves), fresh manure (avoid this), aged manure, weeds, green leaves, and coffee grounds. Here’s a good article about coffee grounds compost: Article: “Coffee Grounds Compost”.
Allow the center of the compost pile to heat to 130-160°F (48-71°C). Use a thermometer to monitor the temperature and if it drops below 130°F it is time to turn your pile. If the organic matter is not breaking down, you have excessive carbon. If your piles emit an unpleasant odor, you have to much nitrogen. Adjust accordingly as a well balanced ratio will not emit odors. With the proper ratio and materials the microbial breakdown will result in a high quality compost that looks, feels, and smells like a good rich, dark soil.
USING AN ACTIVATOR
If you use an activator in your compost pile there are numerous sources. For ease of attainment, we will use organic coffee grounds. You can also use manure, a shovel full of forest floor inoculant, other compost, or a dusting of store bought fungal food (kelp, oatmeal, corn gluten, fish hydrolysate, etc). When adding your activator, also add water to your pile and strive to maintain 50% moisture content by weight. See this article for more on activators: Article: “How to Use Compost Activators”
A discussion at 1:02:44 of this video provides further explanation:

The above video also goes into greater depth at the 50:11 mark on the “perfect” composting method, which is difficult to achieve all the time. Kitchen scraps can help you achieve a good 30:1 C:N ratio and here is one method of combining ingredients to obtain that ratio:
C:N 30:1 10-BUCKET (PERFECT) COMPOSTING METHOD
- 5-6 buckets, BROWN: chunky wood chips, shredded paper, small chopped branches, etc. Carbon is fungal food and this article is great if you’d like to further understand the carbon/fungi relationship: Article: “What Do Fungi Contribute to the Ecosystem?”
- 3-4 buckets GREEN: packed material, chopped
- 1 bucket high-Nitrogen: manure, legumes with nodules (can be 2 buckets if you are monitoring temperature – remember, the nitrogen content will determine the pile temperature)
- Clean water to spray during building of pile – chlorinated municipal water kills good and bad bacteria
*NOTE: the simple bucket numbers above look like they equate to a 1:1 C/N ratio, but in terms of quantities within the buckets it results in a 2:1 green-to-brown ratio due to the tightly packed greens. Actual Carbon to Nitrogen ratios within a mix like this though will be close to the ideal 30:1.
Also in the above video, at 53:56 the video discusses 6′ piles in height and diameter for holding in the heat and curing seeds and pathogens. These are known as “batch piles” because you create a single batch/collection of ingredients forming the complete pile in one endeavor. Use fencing in a 6′ diameter circle layering browns and greens with a bit of manure/coffee grounds between each layer and cover to protect from elements as wind can dry out the pile, excessive sun tends to burn away and evaporate nutrients, and excess rain leaches nutrients. Some rain is ok but torrential rain is not.
When it is time to turn the pile, one can easily remove the wire cage as necessary. The 2-to-1 ratio of greens to browns is adequate enough to get a hot pile when creating a Batch Pile. A 30:1 ratio and below is considered “green” and above a 30:1 ratio is considered “brown.”
- See this article and the chart at the bottom to learn more: Article: “The Carbon:Nitrogen Ratio (C:N)”
- This is one of the simplest explanations of the “greens” and “browns” of composting. Some go into great detail but for the beginning gardener this is very straightforward and easily understood article: Article: “Composing 101: What is Green & Brown”
To control the composting process:
- Check temperature and moisture:
- If it’s too hot, turn the pile and add carbon material
- If it’s too dry add water (a wrung-out sponge moisture level is desired)
- If it’s too cold, give it more time and/or add nitrogen material/an activator
- Cover the pile
Temperature should be checked in three different places and should be 131˚F (55˚C) for three full days to kill weed seeds, pathogens, and pests; but not higher than 160˚F (71˚C) so beneficials are not killed. If your goal is to meet organic regulations, they require 131˚F for 10-15 days and turned 5 times within this time frame. When turning, top of pile becomes bottom, sides become middle, and inside goes on outside on the perimeter and on top. Don’t allow the middle to go above 160˚ F, turn at that point or it will go anaerobic.

PLANTING
Once the site has been selected, analyzed, swaled and earthworked, soil profiled, fenced, irrigation installed, and cover cropped, we are ready to plant. The planting phase will happen in the following ordered steps:
- Germination Variables
- Seedling starts
- Hoop House Construction
- Planting and Harvesting of Hoop Houses
- Large-scale Garden Planting
- Planting of the Food Forest
- Grafting and Planting of Fruit/Nut Trees

Click this Image for the Large-scale Gardening Open Source Hub
GERMINATION VARIABLES
Once the site has been prepped for growing, it is time to start planting. Planting applications vary from site to site depending on what you’re planting and whether it’s in a controlled environment like a hoop house or in the elements like a fruit forest or a large-scale garden. There are several germination variables that come into play including temperature, moisture, light, oxygen, and the seed’s viability and dormancy, which can be influenced by how the seeds were stored and how old they are.
GERMINATION TEMPERATURE
Temperature is one of the most critical factors affecting seed germination. Each seed type has an optimal temperature range, and maintaining that range helps ensure consistent and successful sprouting.
- Optimal ranges: Seeds have different temperature requirements in order to germinate, some prefer warm temperatures while others prefer cooler temps. For example, tomatoes and pepper seeds require warmer temps to germinate and a lot of your green’s seeds (spinach, kale) prefer cooler temps.
- Minimum and Optimum: it is important to know your seeds minimum germination temp. If the temperature dips below this temp any time during the germination process it will not germinate and often become non viable. All seeds have an optimum temperature range, it is important to try and stay within that range.
- Consistent Temperatures: Maintaining consistent temps throughout germination is very important. Fluctuations can cause substantial negative impacts on your seed’s germination.

Click for detailed spreadsheet
GERMINATION MOISTURE
Moisture is necessary for seeds to begin the germination process. Providing the right amount of water, not too much and not too little, helps the seeds swell, activate, and begin growing without risk of rot.
- Water: Seeds must have a continuous supply of water in order to swell and germinate
- Overwatering: watering seeds is not the same as watering plants. Seeds do not have roots yet, so they can easily be overwatered which leads to rot. It is recommended to ensure germination media is evenly watered prior to sowing seeds and then to mist seeds frequently for short periods.
- Soil moisture: Soil needs to remain moist during the germination process, but not soggy.
GERMINATION LIGHT
Light exposure can affect whether or not a seed germinates. Different seeds have different light needs, so understanding each seed type’s preference is key for proper germination.
- Light requirements vary for seed germination, you must know what each seed requires. For example, tomatoes require it to be dark to germinate and celery and spinach require light to germinate.
- All plants require light once they have germinated.
GERMINATION OXYGEN
Oxygen is essential for cellular activity during germination. Soil used for germinating seeds must allow air to circulate freely to support this biological process.
- Germination Soil: the ability for a soil to drain and have good air circulation is most important when a plant is trying to germinate. Seeds need oxygen to produce the energy that’s needed to germinate.
SEED VIABILITY AND DORMANCY
The success of germination also depends on whether the seed is still viable and whether dormancy has been broken. Some seeds require specific conditions before they can sprout, depending on how they were stored and their natural adaptations.
- Viability: a seed needs to be viable, or alive, in order to be capable of germinating.
- Dormancy: some seeds require a period of dormancy prior to germination. They have adapted to certain environmental conditions that have made this a survival skill. Examples of dormancy exposure to cold temperatures, scarification, and soaking in water.
VIDEO COMING: HOW WE PLAN, ORGANIZE, AND BEGIN THE PLANTING PROCESS USING GERMINATION VARIABLES
SEE OUR HOW TO HELP AND/OR CROWDFUNDING CAMPAIGN PAGE TO HELP CREATE ALL THE TUTORIAL VIDEOS FASTER
SEEDLING STARTS
Seedling starts should be planted as soon as possible using all available temperature controlled and well-lit space so that they are ready by the time hoop house construction is complete. They will be planted in the winter for both spring and summer planting and, once ready, they will be used in the hoop houses first and transplanted into the large-scale gardens and food forest later. Estimated space needs for seedling starters to grow sufficient food to feed 100 people within 1 year is about 200 square feet (18.6 sq meters).
In the case of One Community, if we arrive mid-spring to summer a seed starter house will not be immediately needed and we would plan to have a 10′ x 20′ test version of the aquapini/walipini temperature-controlled indoor growing structures built and finished by mid winter; beginning work on it as soon as we have the outdoor gardens planted and estimating 1-2 months to complete it while focusing on all other infrastructure areas too. If we arrive late fall/early winter, we will try to have it completed over the winter or by early spring to use immediately. If for some reason we cannot get it built that first winter, we’ll just do the best we can with existing indoor space and count on the over planting of everything to compensate for poor soil, no seed house, inadequate arrival on property, etc.
HOOP HOUSE CONSTRUCTION
 We project 8 people working in two-person teams should be able to complete the construction of 18 hoop houses in less than 8 weeks. See the Hoop House Construction and Costs section of the open source hoop house portal for complete details on what a hoop house is, why they are useful, how to build them, how much they cost, smaller options, and more.
PLANTING & HARVESTING OF HOOP HOUSES
As the hoop houses are completed, the next step is to begin moving in seedling starts (weather permitting) that will do better in the longer growing season environment a hoop house provides. As soon as possible thereafter, cool season crops will be transplanted along with the grafted rootstock into their permanent sites. Click the planting plan image below for the Complete Planting Plans for the 18 Hoop Houses section of the large-scale gardening open source hub:

Click Image for Enlargeable Maps and Our Page with Complete Plant Descriptions
LARGE-SCALE GARDEN PLANTING
An earlier planting of cole crops will be followed by other crops. To assure we produce enough food to feed 100 people within 1 year, we will intentionally over plant the open gardens and use this initial planting as a gauge for following years and data collection for the One Community open source botanical garden model. Surplus produce will be preserved for winter use. Complete planting details for the large-scale gardens are included on the large-scale gardens page.
CLICK IMAGES OR LINKS FOR A COMPLETE PAGE ON EACH PLANT VARIETY


PLANTING OF FOOD FOREST
The food forest plantings should be an ongoing process that is started as soon as possible. In the case of One Community, the food forest project will also be part of our open source botanical garden model and ultimately expand to involve 100s of acres functioning as both food production and ultra-abundant wildlife habitat. Complete planting details for the food forest are included on the food forest page.
CLICK IMAGES FOR PAGES WITH COMPLETE PLANT LISTS FOR EACH SECTION
![]()
![]()
![]()
![]()
![]()
![]()
![]()
![]()
GRAFTING & PLANTING OF FRUIT/NUT TREES
Grafting and planting of fruit trees will be the focus at the end of the planting phase along with food forest creation. Although many permaculturalists advocate planting fruit trees from seed, we feel water and climate may support flexibility around this idea when people are just getting started. In our case, the sub-optimal growing climate will be coupled with requiring supplemental irrigation on a fairly limited water budget (until water collection and swaling start to help). We feel it would therefore make more sense (in most cases) to plant and nurture a fruit tree of a known cultivar, rather than a seedling. As the years pass and the property develops an increased soil-moisture bank, and expands the above-ground vegetation, seedlings can then be used in outer zone plantings as pioneer trees. Initially, however, we recommend relying on food trees propagated from established cultivars (clones) whenever these can be sourced.
Essential action steps for grafting and planting of fruit and nut trees include:
- Orchard location identification and/or dead orchard tree replacement plan if an orchard already exists
- Surveying and inventorying/accessioning all other food trees and deciding what and when other trees will follow
- Removal of dead trees property-wide and placing them into hugelkultur beds, with the smaller branches chipped
In the case where material is not available as pre-grafted or commercially available stock, ordering rootstock for the main species of fruit trees and grafting your various accessions at the site is recommended. Improved clones of some species that do not require grafting (e.g. Ribes, Rubus), or rootstocks that are difficult to find or very expensive, can be placed in stool beds for multiplication. This will enable your cost for planting stock to diminish annually, and may become a source of revenue if you decide you have sufficient trees to sell surpluses. In the case of One Community and our diverse food forest, unique indoor growing plans, and open source botanical garden model, it is intended that One Community will develop an extensive collection of fruit varieties and little-known fruit species so we can promote, sell, and help preserve these plants that are, in many cases, threatened by extinction.
HERE ARE LINKS TO ALL THE SPECIFIC PLANTING PAGES (click icons for complete pages)

LABOR PROJECTIONS, TRACKING, AND UPDATING
Labor projections are all educated estimates, only for items begun after the first team moves to the property, and based on individuals who can physically and efficiently carry out the tasks. Total hours will be part of community contribution and, in most cases, divided amongst multiple people. The re-evaluation and redefinition of these projections will be ongoing and tracked using our custom software until tasks are completed and a definitive and final hourly time investment can be assessed and shared for each task. The process of projecting, tracking, and updating labor investment in various tasks will continue indefinitely as part of One Community’s open source contribution to global transformation. Here are the projections:
- Starter house construction (if initially needed): (160 hours)*
- Soil profiling and lab related work plus perc testing: (3 hours)*
- Initial swale creation: (240 hours initial + ongoing as required)*
- Soil preparation and amendment: (100 hours initial + 15 hours/month)*
- Orchard irrigation installation: (560 hours)*
- Hoop house irrigation installation: (440 hours)*
- Open garden irrigation installation: (440 hours)*
- Cover crop creation (50 hours)*
- Orchard pruning (125 hours)*
- Seedling starts (250 hours)*
- Hoop house construction (1000 hours)*
- Planting of the hoop houses (320 hours)*
- Planting of the initial open gardens (320 hours)*
- Planting of the initial food forest (128 hours)*
- Grafting and planting of fruit/nut trees (20 hours)*
- Removal of dead trees and hugelkultur creation (64 hours)*
- Fence installation and green fence planting: (80 hours each)*
- Creation of post-survey initial Master Plan: (40 hours)**
- Incoming goods organization and inventory planning: (ongoing: 5 hours/wk)**
- Computer data entry and open source sharing: (ongoing: 40 hours/wk)**
- Video documentation and editing: (ongoing: 80 hours/wk)**
- Food menu creation: (80 hours initial + ongoing: 2 hours/wk)**
- Bulk food procurement: (8 hours of research and ordering + 1-2 hours/month)**
* Tasks detailed above ** Tasks detailed below as part of the Additional Considerations section
.
ADDITIONAL CONSIDERATIONS
To facilitate the planting process happening as quickly and efficiently as possible, certain additional considerations should be made. In our case, we are dependent upon funding, which will determine when we can purchase everything needed and when we can begin the land preparation process. The following important considerations therefore apply to One Community and may apply to others too:
- Internet setup should begin as soon as escrow closes
- Existing orchard survey should be part of closing escrow
- Mapping water infrastructure should be part of closing escrow
- Road improvement needs/plan should be part of closing escrow
- Seed house construction should start the day the second team arrives
- Vegetable seed transplants should be sown as soon as the seed house is complete
- All tools and necessary equipment need to be on the property the day the remainder of the Pioneers arrive
- Nursery supplies, seed house kits/accessories, and initial cover crop seed should be ordered in advance too
- Food menu creation for vegans, vegetarians, and omnivores should be completed before arrival on the property. This will include making connections with bulk suppliers and ordering food so it is ready upon arrival
- If the time of year allows for a cover crop cycle prior to spring planting, get it in immediately behind soil preparation. If arriving in the fall, cover crops should be put in and turned under a few weeks prior to last frost date. In either case, this can take place as some of the site prep (i.e. fencing, irrigation infrastructure, etc.) is installed
Once the first spring garden is planted, we can fall into a seasonal routine of planting, cultivating, fertilizing, harvesting, seed saving, cover cropping, seed starting and potting, equipment maintenance, and replanting.
ONGOING CONSIDERATIONS
These additional projects will be initiated during the first week and continue indefinitely:
- Creation of Master Plan: This shall commence as soon as possible during the planning stages of your project and may, as is the case in our situation, include key points of clarification and design to be complete before escrow closes. The process will then continue until county commissioner approval of each phase of construction and development is achieved. In our case, due to the development and planning necessary for each of the 7 village models, the Master Plan process will be ongoing; beginning approval for successive village models as the designs develop during construction of earlier models
- Incoming Goods Organization and Inventory Planning: Delivery of equipment, supplies, and tools with an accompanying ongoing and open source inventory and use system
- Computer Data Entry and Open Source Sharing: Blogging, open source tutorial creation, accessioning as part of the open source botanical garden model, labor and time investment tracking, etc.
- Video Documentation and Editing: Ongoing video documentation and open source sharing of everything we do
- Food Menu Creation: There will be an ongoing and open source bulk food ordering and menu creation component after the initial menu creation and food ordering
RESOURCES
Here are some additional soil amendment resources and strategy details:
- Excellent 2 Hr Video of Joel Salatin talking about the soil restoration process
- The Art and Science of Making a Hügelkultur Bed
- Another amazing resource about creating Hügelkultur beds
- Here’s a great article on combining hügelkultur and mulching | Alt Link
- Building a Chicken Tractor | DIY Chicken Tractor Plans
- Natural Soil Amendment for Your Garden
- Article: How to Build a Swale in the Residential Landscape
- Permies.com forum covering all things permaculture and sustainable living
- Great Paul Wheaton podcast answering Hugelkultur listener questions: Part 1 | Part 2 | Part 3
- Paul Wheaton Podcast: “Review of Hands-On Agronomy” ” Paul and Helen Atthowe review the DVD and have a very informative talk about soil structure, amendments and fertility
SUMMARY
Open source sharing a comprehensive soil amendment strategy is essential to helping people create food self-sufficiency. We feel our strategy for doing this on enough land to feed 100 people within 1 year is essential to our global-change methodology and self-replicating teacher/demonstration community, village, and city approach because it significantly increases the options for people seeking to grow their own food. In developing this approach we are bringing together the best of the best with the intent to evolve it indefinitely through global collaboration and input. We will open source share this process as we amend 3 acres of low-quality soil and share the necessary tools, resources, videos, labor investment details, cost analysis details, and all other specifics needed to duplicate our efforts globally.
FREQUENTLY ANSWERED QUESTIONS
Q: Where do I learn more about what you will be growing? Please visit these three pages for complete planting details:
Q: Will you be teaching on-going classes about this?
We will offer on-going scholarship and participation programs for all components of One Community as we are building them. This means we will teach on-going classes in all developing areas and then refer to existing organizations and groups purposed specifically for teaching them from that point forward. Any area that is in continuous development (ex: the Education for Life Program, Food Forest, etc.) will provide ongoing classes. Any area that will have a definitive completion point (ex: the earthbag village) will be referred after completion to other teacher/demonstration hubs seeking help and existing organizations specifically purposed and experienced in teaching all aspects related to these areas.
![]()