One Community
Duplicable City Center Electrical
This page contains the following sections related to the Duplicable City Center electrical planning and layout. :
- Related Pages
- What is the Duplicable City Center
- Why Open Source the City Center Electrical Design
- Ways to Contribute
- Consultants to the Development of this Component
- Architecture Overview
- Duplicable City Center Components
- References
- Summary
- FAQ
NOTE: THIS PAGE IS STILL NEEDS EDITING AND UPDATING
CLICK HERE TO JOIN THE EDITING TEAM
RELATED PAGES


![]()
")
")
")
")
CLICK THESE ICONS TO JOIN US THROUGH SOCIAL MEDIA
![]()
![]()
![]()
![]()
![]()
![]()
![]()
![]()
![]()
![]()
What is the Duplicable City Center?
One Community designs open source and free-shared blueprints to save resources and help model a redefinition of how people choose to live. The main structure, the Duplicable City Center, functions as a recreation center, large-scale dining hall, large-scale laundry, library and computer facility, and provides short term lodging for visitors. As part of One Community’s global transformation and replicable teacher/demonstration communities, villages, and city models, this building is designed to create revenue and function as a community center and resource-saving replacement of individual kitchens, laundry rooms, and bathrooms.
The electrical blueprint for the Duplicable City Center (DCC) is based on sustainable principles and follows International Building Code (IBC) and U.S. Green Building Council LEED v4 specifications, innovative design techniques, materials, and application practices; resulting in the highest energy performance possible. For better understanding of this project, basic electrical concepts are required to grasp the fundamentals of the project. This a step-by-step “how-to-design-an-electrical-blueprint” tutorial, based on the IBC, and using One Community’s Duplicable City Center as the example.
Architecture Model for the Duplicable City Center:
With the architectonic project completed, an estimation of all the components necessary is easily determined. In the case:
- (a) Power Outlets
- (b) Light Switches
- (c) Electric Showers
- (d) Tankless Water Heaters
- (e) Smoke Detectors
- (f) Water Sensors
- (g) Smoke Detectors
- (h) Water Sensors
- (i) Motion Sensors
- (j) Door Locks
- (k) Ultrasonic Sensors
- (l) Blinds
- (m) Sound Alarms
- (n) Status Panels
- (o) Vent Dampers
- (p) Dimmers
- (q) Ceiling Lights
- (r) Ethernet Access Point
- (s) Temperature Sensors
- (t) Routers
- (u) CCD Cameras
- (v) Entertainment Systems
- (w) Thermostats
- (x) Furnace Sensor
- (y) Central Controller
These components were selected and integrated for each room of the Duplicable City Center and the following tables indicate the amount of components per room. Further, we will detail each component’s selection, use, and notable code requirements.
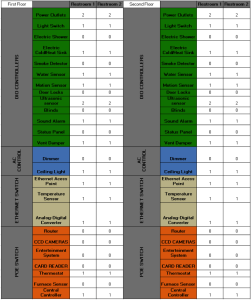
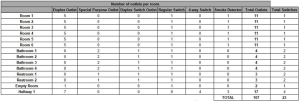
Table 1 ” List of components estimated for the rooms on the first floor.

Table 2 ” List of components estimated for the bathrooms on the first floor.
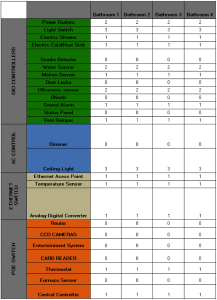
Table 3 ” List of components estimated for the remainder of the rooms on the first floor.
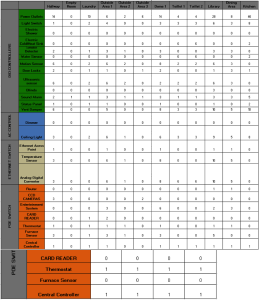
Table 4 ” List of components estimated for the rooms on the second floor.
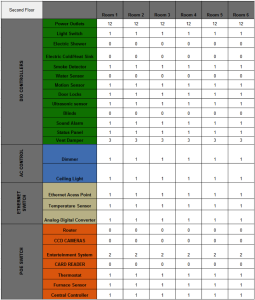
Table 6 ” List of components estimated for the bathrooms on the second floor.
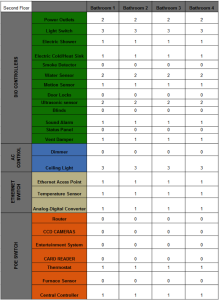
Table 7 – List of components estimated for the remainder of the rooms on the second floor.

Table 8 ” List of components estimated for the restrooms on the first and second floors.
Layout of Equipment in Each Room
After completing the above tables, we created charts and illustrations of the layout of equipment in each room. The corresponding number after an item indicates quantity.
Figure 1 – Chart representing the components in the dining area.
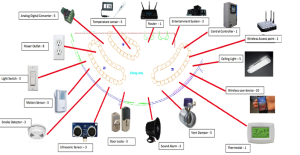
Figure 2 – Chart representing the components in the hall.
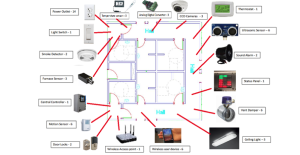
Figure 3 – Chart representing the components in the kitchen and dining areas.
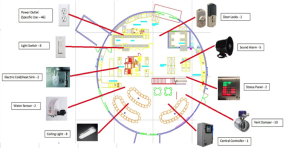
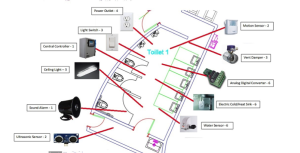
Figure 4 – Chart representing the components in the bathroom.
Definitions:
- Dimensioning of Lighting – Electrical Sizing
- Lighting location points
- Lighting Power (wattage)
- These steps were created using lighting residential design standards for electrical projecting. This technique consists of calculating the amount of Lux in each room. Lux is the SI unit of luminance and luminous emittance, measuring luminous flux per area. It is equal to one lumen per square meter.
In this tutorial we use Dialux professional lighting software, which is a free to use software. Other lighting software programs are available.
The room or area is dependent on the location and wattage of the lights. For accuracy, we used Dialux lighting software to calculate the lux. The lux is the SI unit of luminance and luminous emittance, measuring luminous flux per area, which is equal to one lumen per square meter.
For maximum accuracy and effectiveness in determining the properly sized light fixtures, each room requires separate software calculations taking into account the furniture, door and window openings, floor materials, and ceiling and walls (and their colors). Below are the diagrams and charts displaying the results:
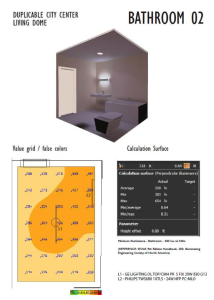
Figure 5 – Dialux final report – Part 1.
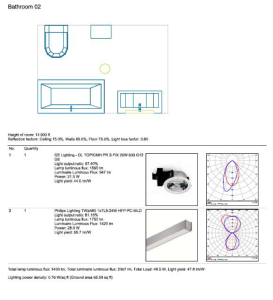
Figure 6 – Dialux final report – Part 2.
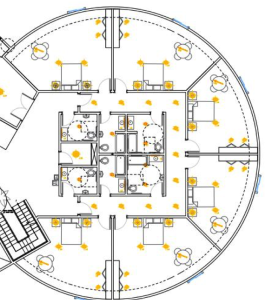
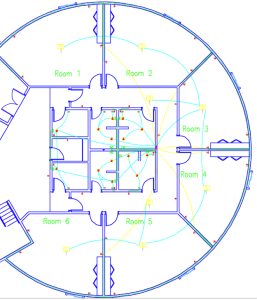
After creating the light project for all the rooms, the lamps were placed in the floor plan, so it is possible to verify on the following figures.
Figure 7 – Living Dome with all lighting locations – First Floor.
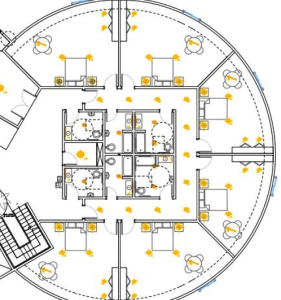
Figure 8 – Living Dome with all lighting locations – Second Floor.
–MISSING–
Table 9 – Quantity and type of lights on first floor of the living dome

Power outlets (receptacles) are conveniently located throughout a structure and serve as the source point for running electrical devices. Seldom do we ponder the intricacies of an electrical system as we are merely focused on having electricity to run a power tool, clock, stereo, lamp, or some other item that mandates electrical consumption. Some devices require more power than others (electric stoves, dryers, larger power tools, etc.) and this requires increased amperage and different gauge wire to carry the current safely.
By code, minimum requirements are established for safety reasons, but the owner/designer can exceed those minimum requirements as long as they do not overload the circuits. To prevent this, additional circuits are added to prevent excessive power on any single circuit and some uses require dedicated circuits, those that control a single appliance or type of machinery that has a high power requirement.
Rules and regulation for placing an outlet:
- The IBC does not specify where outlets and lighting should be placed; the code says that is up to the client or the person in charge of the project, according to the use. To have a pattern it was decided follow the NBR 5410:2004, The NBR recommend that:
- Rooms with 6m² or less should have at least one outlet.
- Rooms with more than 6m² (64.58 ft²) should have one outlet each 5m evenly spaced.
- Kitchen, laundry and similar places should have one outlet each 3.5m evenly spaced.
- Bathroom should have at least one outlet above the sink, 60cm from the shower box.
NOTE: That is just a recommendation from NBR. It is strongly recommended use more outlets than calculated, so will avoid future problems about lack of outlets.
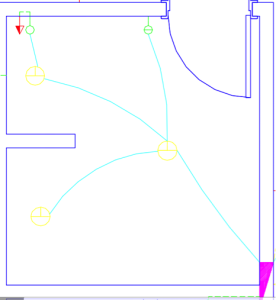
Figure 9 – Designation of , lights, and switches.
Above, switches are shown in green, duplex outlets in red, and lights in yellow. All symbols are explained on the legend attached in the blueprint.
Figure 10 – Living Dome with receptacle (outlet) locations – First Floor.
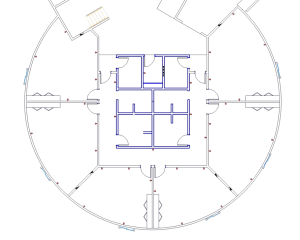
Figure 11 – Living Dome with receptacle (outlet) locations. – Second Floor.
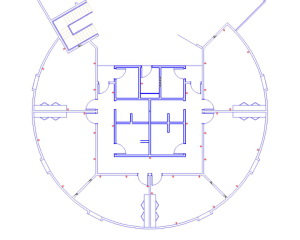
Table 10 – Number of outlets, switches and smoke detectors on the first floor of the living dome
The main panel should be centralized, minimizing cable and conduit runs resulting in an efficient installation that reduces overall project costs. The primary shutoff in the main panel is generally located on the exterior of the structure in a waterproof metal panel. From this point on, all further panels are designated as sub-panels. These sub-panel distribution points are fed by a larger gauge wire originating in the main panel and house circuit breakers that will control each circuit and can be shut down selectively without interfering other circuits when future maintenance and repairs necessitate the need.
After defining the main panel location the overall electrical demand determination is made by
Distribution Boards: Â Ã’ Ã’ Ã’ Ã’ Ã’ Ã’ Ã’ Ã’
- It should be placed as centralized as possible, so the usage of cables and conduits can be optimized, avoiding waste of material.
- Determining the demand: After defining demand (voltage and current) for lights and outlets, electric current correction factor must be applied following the regulations. This factor varies according to the power demand (kW). The value found in kW must be multiplied by its factor in order to achieve the real power demand. Using the formula Power=Voltage*Current, the real current will also be achieved.
- Size the circuit breakers and protection devices according to the demand
- Design distribution boards
- Decide whether distribution panels are going to be divided into sub-panels or not. That standard varies according to the county, state or even country. There is no specific way to design panels. Application and use should be observed. In the DCC project, sub-panels inside the rooms containing just the automation part are going to be used. Another alternative is to design sub-panels containing electrical part (outlets and switches) plus controllers (door locks). Also, the use of just one big panel might be recommended as well and, depending on the application, it is a great idea.
Wiring: The cheapest, but one of the most important parts in the project; an effectively designed wiring project reduces future costs regarding maintenance. Usually, it is the last system to require maintenance or substitution (distribution panels and switches for instance require periodic review). Expenses should not be considered on this part of the project, but functionality and efficiency. Conduits should be traced from the distribution board to the ceiling lighting points and then to the outlets and switches. Always look for the shortest distance, to eliminate excess/waste of material.
5.1) The points located in the same wall, must be connect through it.
Electrical Ducts ” Electrical conduits, or other raceways round in cross-section, that are suitable
for use underground or embedded in concrete. [NFPA 70.]
Underground Cables and Conductors under Buildings ” Underground cable and conductors installed under a building shall be in a raceway. [NFPA 70].
Conductors and Busbars on a Panelboard ” Conductors and busbars shall be located so as to be free from physical damage and shall be held firmly in place. [NFPA 70]
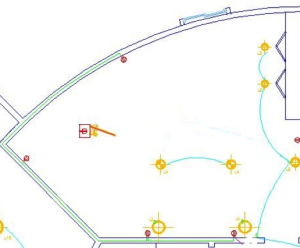
Figure 12 . Electrical blueprint of one room.
The Figure 12 shows clearly how you need to trace the conduits and locate the distribution board (pink box). Also, demonstrate the distribution board being placed as centralized as possible to not waste material and, as a result, money. ( Figure 13).
Figure 13. Electrical blueprint of the social dome
Branch Circuits ” Branch circuits recognized by this article shall be rated in accordance with the maximum permitted ampere rating or setting of the overcurrent device. The rating for other than individual branch circuits shall be 15,20,30,40, and 50 amperes. Where conductors of higher amperage are used for any reason, the ampere rating or setting of the specified overcurrent device shall determine the circuit rating. [NFPA70]
A multiwire circuit shall be permitted to be considered as multiple circuits. All conductors of a multiwire branch circuit shall originate from the same panelboard or similar distribution equipment.
Conductors of the same circuit ” All conductors of the same circuit and, where used, the grounded conductor and all equipment grounding conductors and bonding conductors shall be contained within the same raceway, auxiliary gutter, cable tray, cable bus assembly, trench, cable, or cord. [NFPA70]
- How we choose the components
In this section we will explain details on how to choose certain components. In this tutorial we are displaying the components that we used. It is possible to see a list of components at the end of this section.
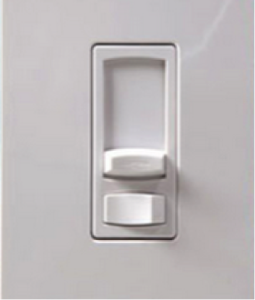
a. DIMMER
To choose a dimmer to put in your house there are 4 steps recommended that you should follow to choose the best one for you.
STEP 1: CHOOSE THE DIMMER TYPE
Figure 1 – Dimmer
- Single-Pole Dimmer ” The single-pole dimmer is designed for light fixtures that are controlled by only one dimmer in your home. In other words, this dimmer is the only switch used to turn your lights on and off, as well as to dim.
- Three-way or Four-way Dimmer ” These dimmers are for light fixtures that are controlled by only one dimmer plus one or more on and off switches in other places in your home.
- Multi-location Dimmer ” If your light fixture uses multiple companion dimmers, you will need a multi-location dimmer. Using multiple dimmers allows full dimming control from more than one location.
- Plug-In Dimmer ” Plug-in dimmers are used to dim the bulb in your table and floor lamps. Many of these lamp dimmers are compatible with incandescent, CFL, and LED bulbs.
STEP 2: CHECK THE BULB TYPE
- Incandescent/Halogen ” If you are using standard incandescent or halogen lighting in your home, standard incandescent dimmers are what you’ll need to reduce the brightness. These dimmers work in a very interesting way. Many people might think that dimming involves reducing the electrical current, but actually, dimmers rapidly turn the bulb’s circuit on and off at rates much faster than we can see (typically over 100 times per second).
- Compact Fluorescent and LED ” In order to dim energy-efficient lights, you should first make sure that the lights themselves are capable of dimming. Because technology is advancing, dimmable LED and CFL technology is becoming much more reliable. Once you’ve got your dimmable bulbs, you can then focus on making sure your dimmer is compatible. If you were to try to use an incandescent dimmer with an LED or CFL, it would only cause your lights to not dim correctly or malfunction completely.
- Magnetic Low-Voltage (MLV) ” Low-voltage lighting systems require the use of a transformer to regulate the line voltage. If a transformer used within a lighting system is magnetic, you will need a magnetic dimmer. Magnetic dimmers are inductive and use symmetric forward phase-control in order to dim.
STEP 3: CHECK THE NEED WATTAGE
- Once you know what kind of light source you’re using, you have to be sure the wattage of your bulbs is compatible with your dimmer. That said, you also must take into consideration how many bulbs you are using on one dimmer. Some people assume that just because LEDs consume less wattage, the same incandescent dimmer can be operated with more LED bulbs that consume a fraction of the wattage of an incandescent. Due to something called inrush current, or the maximum, instantaneous input current drawn by an electrical device when first turned on, using more LEDs than you would incandescent on a dimmer will only render the dimmer ineffective.
- For example, if your dimmer can handle 300 watts of electricity and five 60-watt bulbs, that does not mean that it will be able to handle 30 or more LEDs at 8.5 watts. If a dimmer could only handle five incandescent bulbs, only use five LEDs.
STEP 4: CONTROL STYLE
- Once you’ve gotten past all of the technical elements and narrowed down your choices, you can start to focus on the more superficial items; such as how the dimmer looks. Dimmers come in many different colors and styles, so it’s all a matter of personal preference. The styles of the dimmer switches are varied and come in options as varied as toggles, rotaries, and even touch-sensitive dimmers.
b. Â Ã’ LIGHT SWITCH
What is a light switch?
A Light Switch controls the power and devices by turning off the hot side of the circuit.
Ideally, some care is taken from the preparation of the construction and architectural design when choosing the light switches. Switches are directly related to the safety and comfort of users. The quantity and location thereof shall be compatible with the capacity of general electrical facilities construction and the needs of its members. As a general rule, they should be close to the doors, sinks and worktops (for bathrooms, kitchens and service areas).
You should take into consideration when choosing switches that the mains voltage is 120-240v. In addition, we must consider the amperage of the circuits exceed the maximum amperage required by the manufacturer, usually 12 Amps.
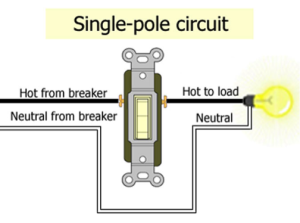
There are three basic types of switches used in lighting of a house: An On / Off switch, switch 3-way and 4-way switch.
On/Off Switch
If you need to control a set of lamps or a single lamp in a location that only contains one entry, the most appropriate model would be the on / off switch. It has two brass terminal screws. It has a “hot wire” that controls current from one circuit that can be connected to a bulb lamp.
Inside an On/Off switch there’s a spring-loaded gate. When you change the switch to On, that gate snaps closed and lets the electric flow through the switch to the light. For the Off position the switch snaps open and it opens the circuit and interrupts the electric flow to the light.
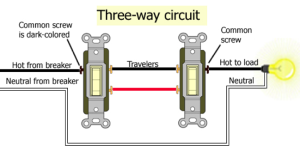
This switch is recommended for the area where you have to turn on/off devices or lamps of different locations, or for locations containing 2 entries. An example would be a room where I would have a switch next to the bed and the other in the doorway. Or, a hallway where I have two entries and one switch next to each entry. Indicated for combined living-dining room, stairs (allows on-off at each end of the ladder), rooms. In the rooms with this type of connection the headboard allows on-off without getting up.
The switch for connecting three-way shall be 3 pins (parallel off).
Note that the “hot wire” and the return are connected at the pin between the parallel switches.
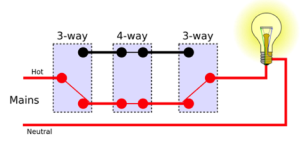
4-Way Switch
It is a very common command to have a lamp or group of lamps in 3 or more points and for this solution we have the intermediate switches or 4 way, which means 4-way switches do this in the four links as we can see in the picture below. It has four brass terminal screws.
c. Motion Detector
Motion detectors are small electronic eyes that detect infrared waves”heat waves that radiate from moving objects. There are some different types of motion detectors:
- Infrared: (PIR) or infrared sensors are activated by the movement of a person’s body heat through a zone. The style commonly used mounts in a normal switch box and usually replaces a standard light switch. This type of sensor is best used in small-enclosed spaces such as a private office. Typically, no extra wiring is needed. The down side of PIR sensors is they cannot see through windows, walls, or partitions. Occupants must be in direct sight.
- Ultrasonic: Ultrasonic sensors operate on a similar principle to radar. Low frequency sound patterns are sent out from the sensor into an area, moving objects altering the signal activate the sensor. These are best suited where there is not always a line of site of the room occupants. A typical application for this type of sensor is restrooms. The hard surfaces make minor motion detection much easier.
- Dual Technology: Dual technology sensors use… Well you guessed it, both types of technologies. This type of sensor virtually reduces any false triggering when no one is in the space. The minor drawback to this type of technology is that it does cost slightly more.
In addition, there are other features that should be considered such as:
- The range of the sensor
- Price
- Voltage
- Amperage
- Brand
A considerably good motion sensor should have all these features optimized as much as possible, like a fair price, high range to avoid buying unnecessary extra sensors, voltage according to the dwelling’s electrical installations, same as amperage, and a brand well known in the market.
d. SMOKE DETECTOR
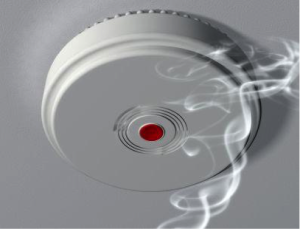
 Ò Ò Ò Ò Ò Ò Ò Ò Ò Choosing a good smoke detector can make a big difference in saving lives during a fire. Firefighters estimate that you have 2 minutes to evacuate a house if a fire starts. The steps below will help to make an informed choice.
Step 1: Type of smoke detectors
- Ionization-type smoke alarms have a small amount of radioactive material between two electrically charged plates, which ionizes the air and causes current to flow between the plates. When smoke enters the chamber, it disrupts the flow of ions, thus reducing the flow of current and activating the alarm
- Photoelectric-type alarms aim a light source into a sensing chamber at an angle away from the sensor. Smoke enters the chamber, reflecting light onto the light sensor; triggering the alarm
- Dual-sensor smoke alarms incorporate both ionization and photoelectric sensor components. They are the most costly but provide the best smoke detection for home use. (You can also buy both separate ionization and photoelectric smoke detectors and use them together.)
- Another type of smoke detector, the air-sampling smoke detector, uses a sensor in a network of pipes through which air is circulated, to determine whether smoke from a fire is present. They are similar to ionization alarms but more sensitive and geared for business and scientific environments (warehouses and laboratories) where a higher degree of smoke sensing is called for.
Step 2: The source of power
Many smoke detectors run on 9-volt, AA, or AAA batteries, which must be replaced periodically, while others are equipped with lithium batteries designed to last for the 10-year life of the unit, while others are designed to be wired into household current and have backup batteries that kick in when the power goes out.
Step 3: Look for a unit that is easy to maintain
Smoke detectors should be vacuumed once a month to remove dirt that can block their sensors or trigger false alarms. Hinged or removable covers can make vacuuming easier. Also, some smoke alarms feature slide out battery drawers to make inserting new batteries easy.
Step 4: Consider any special needs you may have
Some smoke detectors come with options or add-on equipment to supplement the audio alarm, such as a visual alert system for the hearing-impaired.
e. ROUTERS
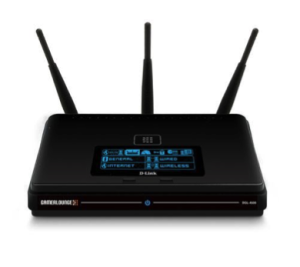
The wireless router is the most popular way to distribute internet in short distances. After initial configuration, further maintenance is not needed. However, when buying/picking a new router, some features need attention and must be observed, such as signal intensity, standards and so on.
Standards: Wireless short-distance networks have several standards operating at a frequency of 2.4 Ghz and 5 Ghz. Which are: B, G, N, and AC. The most commons are IEEE 802.11 B or G. Each standard has its pros and cons. The type B has speeds up to 11 Mbps while type G speeds up to 54 Mbps. In reality, speed floats from 3Mbps and 6.7Mbps, so there’s no big difference between type B and G. There are also routers that use both standards at the same time, they can provide internet for any kind of equipment with Wi-Fi. Ex: 11 Mbps IEEE 802.11 B/G mixed.
For applications that do not require more than 10 Mbps, the routers whose standards are 802.11 B/G are recommended. For higher speeds, the type N might be the solution. It speeds up to 450 Mbps. However, cheap models might not provide more than 150 Mbps. Most modern phones and tablets cannot support the N standard, since they just don’t require this much speed.
There’s also the AC standard, whose speed goes up to 1Gbps. Those routers are unnecessary for domestic use, unless the user really needs high speed internet. The N standard provides more than enough for applications that do not require more than 100 Mbps of internet.
Antennas: Another common mistake people do when going to buy a router is paying excessive attention to the number of antennas. Antennas don’t necessarily relate to the signal range, since modern routers have multiple internal antennas. The best N and AC standard routers, the fastest ones, don’t have external antennas. The N and AC standard routers have also the best signal range, both inside and outside residences.
Before buying a router, the use must also be checked: house/rooms dimensions, number of devices using internet and signal range.
f. Â Ã’ ALARM BUZZER
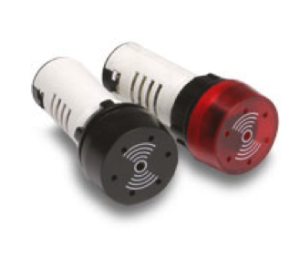
How to Choose an Alarm Buzzer
There are many features to outdoor sirens that can make them a useful and effective addition to your home security system. Before you consider outdoor alarm sirens, however, be sure to check with your local police or city hall about noise ordinances in your community. When choosing, look for one with a durable, weather resistant housing since it will be exposed to the elements. If extreme temperatures are likely, look for one that can handle them. Outdoor sirens are best mounted at the front of the house for optimal sound and visibility, so be sure to choose one that is visually pleasing. In addition, consider these features:
- Single or twin sounders, usually 105 to 115 decibels
- Battery backup
- Low operating voltage to save energy
- LED light indicator for low battery tampering, AC failure
- Color options, usually red, orange, blue, yellow
- Combination siren and strobe
- Unique sounds for fire and burglary
- Programmable siren duration
After reviewing these topics you will be able to choose the best one for you.
g. THERMOSTAT
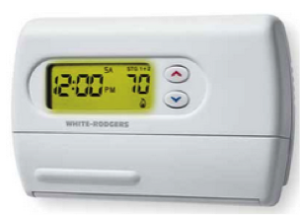
Before choosing a thermostat, you’ll need to make sure it’s compatible with your heating and cooling system. The most common system types are central heat or central heat and air, which can be 24V, gas, oil or electric. Other system types include heat pump, electric baseboard, fireplace, and floor / wall furnace.
STEP 1: Choosing The Type Of Thermostat
There are five types of thermostats that are commonly used in Homes. Â Ã’ Ã’ Ã’ Ã’ Ã’ Ã’ Ã’
- Learning
Learning thermostats offer the benefit of being programmable, but don’t require you to actually program them. They learn as you use them and create a schedule based on your preferences. They can turn themselves down when you’re away, guide you to energy-efficient settings and provide monthly energy reports. These thermostats connect to your home Wi-Fi network and can be monitored, set and managed remotely over Wi-Fi from a computer, smartphone or tablet. - Remote Energy Management
A remote energy management thermostat allows you to set, program and monitor your heating and cooling system from a computer, smartphone or tablet. The thermostat connects through a hub (sold separately) to your home broadband network, allowing you to access it over Wi-Fi from anywhere. - Programmable
A programmable thermostat makes the most efficient use of your system by automatically adjusting the set temperature throughout the day. You let the thermostat know your preferred temperature at different times of the day and night, then forget about it ” the thermostat does the work. - Digital Non-Programmable
A non-programmable thermostat with a digital read-out is the best choice for people who prefer manually-controlled settings with the convenience of an easy-to-read LCD display. - Mechanical / Manual
With a mechanical or manual thermostat, you control the temperature setting manually. These are best for people who are home often and prefer a fixed temperature.
If you choose the programmable Thermostat, which is often the best option in many cases, you will still need to determine which will be the best fit for you as there are different types of this kind of thermostat.
Types Of Programmable Thermostat:
7-Day
These thermostats allow you to program a unique setting for each day, offering the ultimate in flexibility. You can set up to four periods per day, every day of the week. This option is great for people with busy schedules.
5-1-1 Day
This type of programmable thermostat will allow you to set one program for the weekdays and separate programs for Saturday and Sunday. This type of thermostat can be programmed for up to four periods per programmable session.
5-2 Day
This option allows up to four programmable sessions with separate settings for the weekdays and weekends.
1 Week
This option allows you to set one program for the entire week with up to four sessions.
h. ULTRASONIC SENSOR
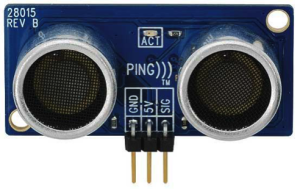
Ultrasonic sensors can be used to detect the movement of objects on an assembly line, to detect the presence of people or substances in various states in a reservoir, allowing the measure of their level. These sensors can measure at distances ranging from several millimeters to even meters. An ultrasonic sensor is basically a sonar.
When choosing an ultrasonic sensor, the wavelength and thus the frequency is very important because it determines the minimum dimensions of an object to be detected. Other factors to consider when choosing a type of sensor include power / voltage, operating current, effect angle in degrees (the correct orientation of the sensor is critical to obtain a good system performance), range and accuracy.
Ultrasonic sensors can be used to detect level and height, separation measurement, diameter in coils, to count objects / transparent materials (color independent and present in dirty environments with fumes, or even in liquid state, with safety. Specifications vary according to the operation.
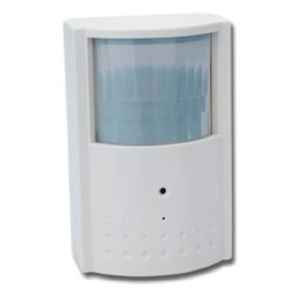
i. CCD CAMERA
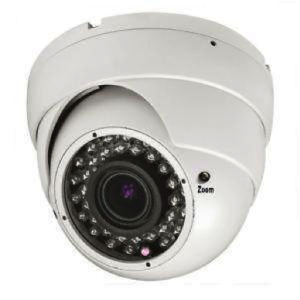
There are a lot of different security cameras available in a saturated market. Which one is suitable for you? These cameras may come with or without audio capability. Most cameras don’t have audio capability. Make sure you choose the correct one to suit your needs. Security camera basically includes (1) Pinhole Camera. Some are as small as a sugar cube with lens opening of 1 mm. It can be hidden behind any hole larger than 1 mm. (2) Board Camera: A small PC board with built-in mini camera. Suitable for concealing in many objects. (3) Dome Camera: A mini camera is built inside a dome-size plastic obscure protector. Suitable for installation on the ceiling or wall. (4) Standard Surveillance Camera: Visible security camera installed indoor or outdoor to scare away unwanted visitors; (5) Water-resistant Security Camera: Standard surveillance camera with water-resistant protective case. Suitable for outdoor installation. (6) Waterproof Hidden Camera: A small pinhole or mini camera with water-proof case so that it may be put underneath the water. For example, inside a fish tank.
The technology in these models is basically the same for different models, except that the camera may consist of either a CMOS or CCD image sensor, and the product size is also different for different purpose.
Reference: http://www.vfmstore.com/faq.html#8
j. CEILING LIGHT
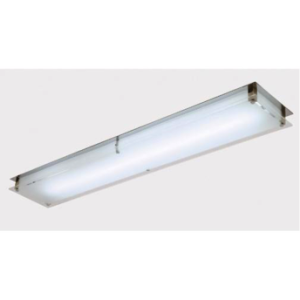
Objective: to make a building feel pleasant and comfortable inside, to design the interior lights to feel as natural as possible, to provide an open feeling of the building rather than distracting, to simulate daylight on dark days or in the winter, to keep the interior feeling more physically comfortable in extreme weather.
Methods of selecting the proper lighting
Lobby, entrance hall and stairs:
- Combine lighting and decoration in order to provide a good first impression. Consult architects or interior decorators for this task.
- Make sure to choose the appropriate decorative accessory for the size of the space.
- Remember that the stairs and corridors must have good general lighting for your safety.
Rooms in general:
- Use proper lighting to show the best of the space.
- Use built-in lighting to illuminate a common area.
- Use fluorescent bulbs in order to save money.
Kitchen:
- Plan according to the frequency of activity. Define the proper lighting for each area: general, for cooking, for decoration, for highlighting.
- Choose decorative fluorescent fixtures centered space for food preparation.
- Place some lighting under the cabinets to help prevent shadows and to create much needed lighting for food preparation.
Bathrooms:
- Use either halogen or even compact fluorescent bulbs for bathrooms lighting.
- Avoid shadows on the face. Placing a lamp on the mirror might solve the problem.
Note: When dealing with lighting design, walls/ceiling colors and temperature must be considered (white places accentuate the feeling of openness and airiness even more by reflecting light).
k. POWER OUTLET
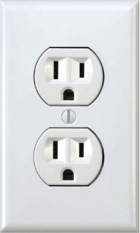
Modern electrical receptacles have changed in keeping with upgrades in electrical needs. Today you have a variety of outlet options designed to match the requirements of your appliances, power tools and electronics, whether you are renovating an existing home or building a new home. Each Power outlet receptacle has a specific feature. The most common outlets are explained below:
Types Of Outlets
- 15-amp duplex receptacles “ The duplex receptacle has been the standard electrical outlet in American homes since the 1960s. Each of the two outlets has a long (neutral) slot, a shorter (hot) slot, and a half-round grounding hole.
- Combination Outlets “ Combination outlets are space-saving designs that provide two features in one device, such as an outlet with a guide light, a GFCI outlet with a switch or a switch with an outlet.
- GFCI “ A ground fault circuit interrupter receptacle protects from hazardous ground faults, which occur when electrical current travels through any abnormal path to ground, and can be dangerous if the current travels through a person. One way a ground fault can occur is if an appliance plugged into an outlet becomes damaged. The GFCI works by monitoring the current flowing through the hot and neutral conductors in order to determine if any current is leaking from the circuit. The GFCI will trip and quickly turn off power if the leakage reaches a potentially hazardous level. Code requires GFCI receptacles be installed in bathrooms, wet areas of kitchens, basements and outdoors.
- Arc-Fault Receptacles ” Similar in appearance to the GFCI receptacles, these newer devices work differently than ground faults. AFCI Receptacle offers advanced technology to help protect against electrical fires resulting from arc-faults. Designed to detect a wide range of potentially hazardous arc-faults resulting from damage in branch circuit wiring as well as extensions to branches such as appliances and cord sets, the AFCI responds by interrupting power. This helps reduce the likelihood of the home’s electrical system being an ignition source of a fire. Often unseen, arc-faults can occur anywhere in the home’s electrical system including within walls, at loose electrical connections or within electrical cords accidently damaged by impinging furniture. AFCI’s are now required by the National Electrical Code in many areas of the home
- These outlets are required by the 2012 National Electrical Code in damp or wet locations, such as patios, decks and pool areas, or any other residential outdoor location. The 15-amp and 20-amp weather-resistant outlets are built with UV stabilized thermoplastic and corrosion-resistant metals for superior performance outdoors, including cold impact resistance. You can choose from combined weather/tamper-resistant outlets or weather-resistant GFCIs with or without tamper-resistance. Note: Outlets in damp or wet locations should always be installed with weather-resistant covers.
- Rotating outlets “ These outlets can be positioned to accommodate more than one of the large transformer-type plugs from cell phone chargers, hair dryers, cordless appliances, MP3 players, night lights and more, eliminating the need for power strips.
- Tamper resistant receptacles “ These receptacles, which can be used in place of conventional 15-amp and 20-amp outlets, are required by the 2012 National Electrical Code for use in new construction or renovation. Designed to help protect children from electrical injury, they have a built-in shutter mechanism that blocks insertion of most small objects. The shutters only open when a properly rated plug is inserted. Once installed, they are permanent, offering continuous protection unlike plastic outlet caps that can be removed.
Specialty Outlets
Sometimes, the electrical circuits in residence need special wiring in order to withstand high levels of current. In this case, a special receptacle is also required.
- 20-amp outlets “ If you are installing a receptacle where you will have high-current devices, such as small appliances in a kitchen, 20-amp receptacles are essential. Use 20-amp outlets only on 20-amp circuits, which can be identified by looking at your circuit breakers. Twenty-amp outlets have a horizontal slot connected to one of the vertical slots in the outlet.
- Surge suppression outlets “ Surge suppression receptacles, like surge protectors, are designed to protect sensitive electronic equipment from power spikes without the need for power strips.
- Split circuit receptacles “ A split receptacle has two outlets with each wired on a different circuit or with one outlet live and the other switched. With a split receptacle you can have a wall switch to turn a light on or off or remotely control one plug-in location but not the other.
- 30-amp or 50-amp 125V/250V receptacles “Some heavy-duty appliances, like a clothes dryer or cooking range, or power tools require a 125V/250V receptacle, which has a special prong configuration.
- Ungrounded or ungrounded/unpolarized outlets “ Homes built before the mid-1960s may have ungrounded outlets. These outlets are similar to standard duplex receptacles, in that they accommodate two-prong plugs, but they are missing the u-shaped grounding hole. These outlets are polarized, with one long (neutral) slot and a shorter (hot) slot, which allows them to accept many contemporary household plug.
l. STATUS PANEL
A status panel is a tool with the ability to monitor the key performance indicators through a single interface, enabling expose and visually, the information of each component connected to the panel.
Why install a status panel in a building?
- Control Panel translates strategy into action and customized goals and initiatives to each team in the company or network.
- Refines the strategy allowing managers to make small corrections in the course of company to achieve the strategies
- Improves future performance visibility by collecting relevant data which allow a projection of scenarios based on past activities
- Reduces the cost by standardizing the redundancy of the information, allowing the elimination of parallel information systems
- Empowers users by providing direct access to information
- It provides fast accessible information, since the information is gathered in one place.
A control panel provides the right information at the right time to the right users, way to create more favorable conditions for decision-making, which increases efficiency and anticipate production results.
m. WATER SENSOR

Water damage can occur almost anywhere in your house. Water-using appliances and fixtures, such as refrigerators with icemakers, dishwashers, washing machines, toilets and water heaters are common locations of leaks. There are two types of leak detection systems:
- Active: Usually generate some type of alarm, but also perform a function that will stop the water flow. They feature a shut-off valve and some means to determine that a leak is occurring. Most devices use moisture sensors to detect a leak. Other systems use a flow sensor and a timer to determine that something is leaking and the water needs to be turned off.
- Passive: Are intended to alert you of a leak. They generally sound an audible alarm tone and some may also feature a flashing light. Passive systems are frequently battery-operated, stand-alone units. They are inexpensive and easy to install. Some simply sit on the floor while others may be wall mounted. A moisture sensor is located on the floor and activates the alarm when it becomes wet.
Water sensors can be used in many places in a building, like sinks, washing machines, showers, refrigerators with icemakers, dishwashers, toilets and water heaters, etc. If a water leak goes undetected, it can lead to rotting house framing and subfloors, and can be a precursor to a catastrophic leak that can release several gallons of water per minute, causing extensive water damage. A water leak detection system may help prevent these problems.
An important feature to consider when choosing a water sensor should be the efficiency. Some models of leak detection systems can be connected into a home’s security or fire alarm panel. If it detects water, it can send an alarm to an off site monitoring company.
n. ELECTRIC COLD/HEAT SINK
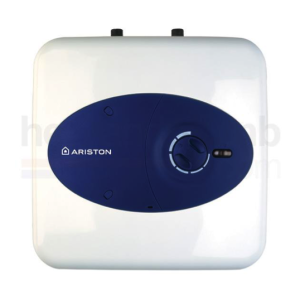
Several factors must be considered to choose the ideal water heater. Initially you need to pay attention to the hydraulic question. Check the pipes for cold water, hot water and for gas that will keep the heater. This can be a model LPG (Liquefied Petroleum Gas) or Natural Gas. In the choice of domestic heating equipment, you need to properly analyze the consumption points to use. They can be showers, faucets, bathtubs etc. Know that, for a better use of these passages heaters the essential factor is to know the exact number of consumer sites.
Another point to consider being unfavorable to the good performance of equipment. The farther the heater is from the place of consumption, the greater the loss of temperature. Therefore, we insist on verification of hydraulic issues, because it affects the functioning of the heater. If the minimum distance between the place of consumption and the box is not the most appropriate, pressurizing the hydraulic network is required.
Types of heater
- By accumulation: The water heating is previously done in an reservoir. Usually suitable for large volumes of hot water.
- By passage: This heater heats the water model when you use a hot water tap. It is best if your desire is an instant water heating, without the need to have an accumulation tank.
o. Furnace sensor
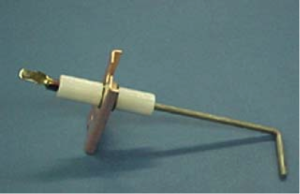
What is it?
The burning flame have visible or invisible gases produced by a fire. The flame detectors are line of sight devices that generate an alarm signal when exposed to radiant energy of the flame. As this radiant energy travels at the speed of light, flame detectors have the potential to be fast-acting. We should take care when applying these devices that work in line of sight to ensure that its effectiveness is not undermined by obstructions such as structural elements, equipment, or the presence of dense smoke or gases. Flame detectors, given their rapid detection of potential (its reaction time is around milliseconds) are generally used where there is a significant risk as storage areas and fuel transfer areas of industrial processing and in situations which may cause explosions or very rapid progression of fires.
A furnace sensor is a sensor usually used in a home furnace or on a large boiler, it is a very important safety device to prevent accidents caused by gas leak. In an instance when the flames are off and the furnace or boiler remaining powered by gas, the furnace sensor would send an electrical signal to a central controller will operate the valves or gas fuel attached to the combustion chamber. After this, the flame sensor would act as a timer, when it reaches a predicted time the sensor is read constantly seeking to monitor if there is combustion of fuel.
There are two types of sensors: an optical reader and bi-metallic strip, that working send an output voltage to indicate the input, in the case, the presence of a flame. The bi-metallic strip generally send a small voltage in contact with the flame. Also, the optical reader works similarly as the bi-metallic strip using a photocell that when in contact with UV light send an output voltage in the range of 2-5 volts and are usually used in industrial applications.
The furnace sensor should be chosen taking into account the sensor sensitivity when exposed to the temperature difference and where it will be installed.
Table 11 -Example of a list of Components for Duplicable City Center

References:
http://www.the-house-plans-guide.com/make-your-own-blueprint.html
http://www.powerstream.com/Wire_Size.htm
http://www.nfpa.org/codes-and-standards/document-information-pages?mode=code&code=70
http://www.iar.unicamp.br/lab/luz/ld/normas%20e%20relat%F3rios/NRs/nbr_5410.pdf